
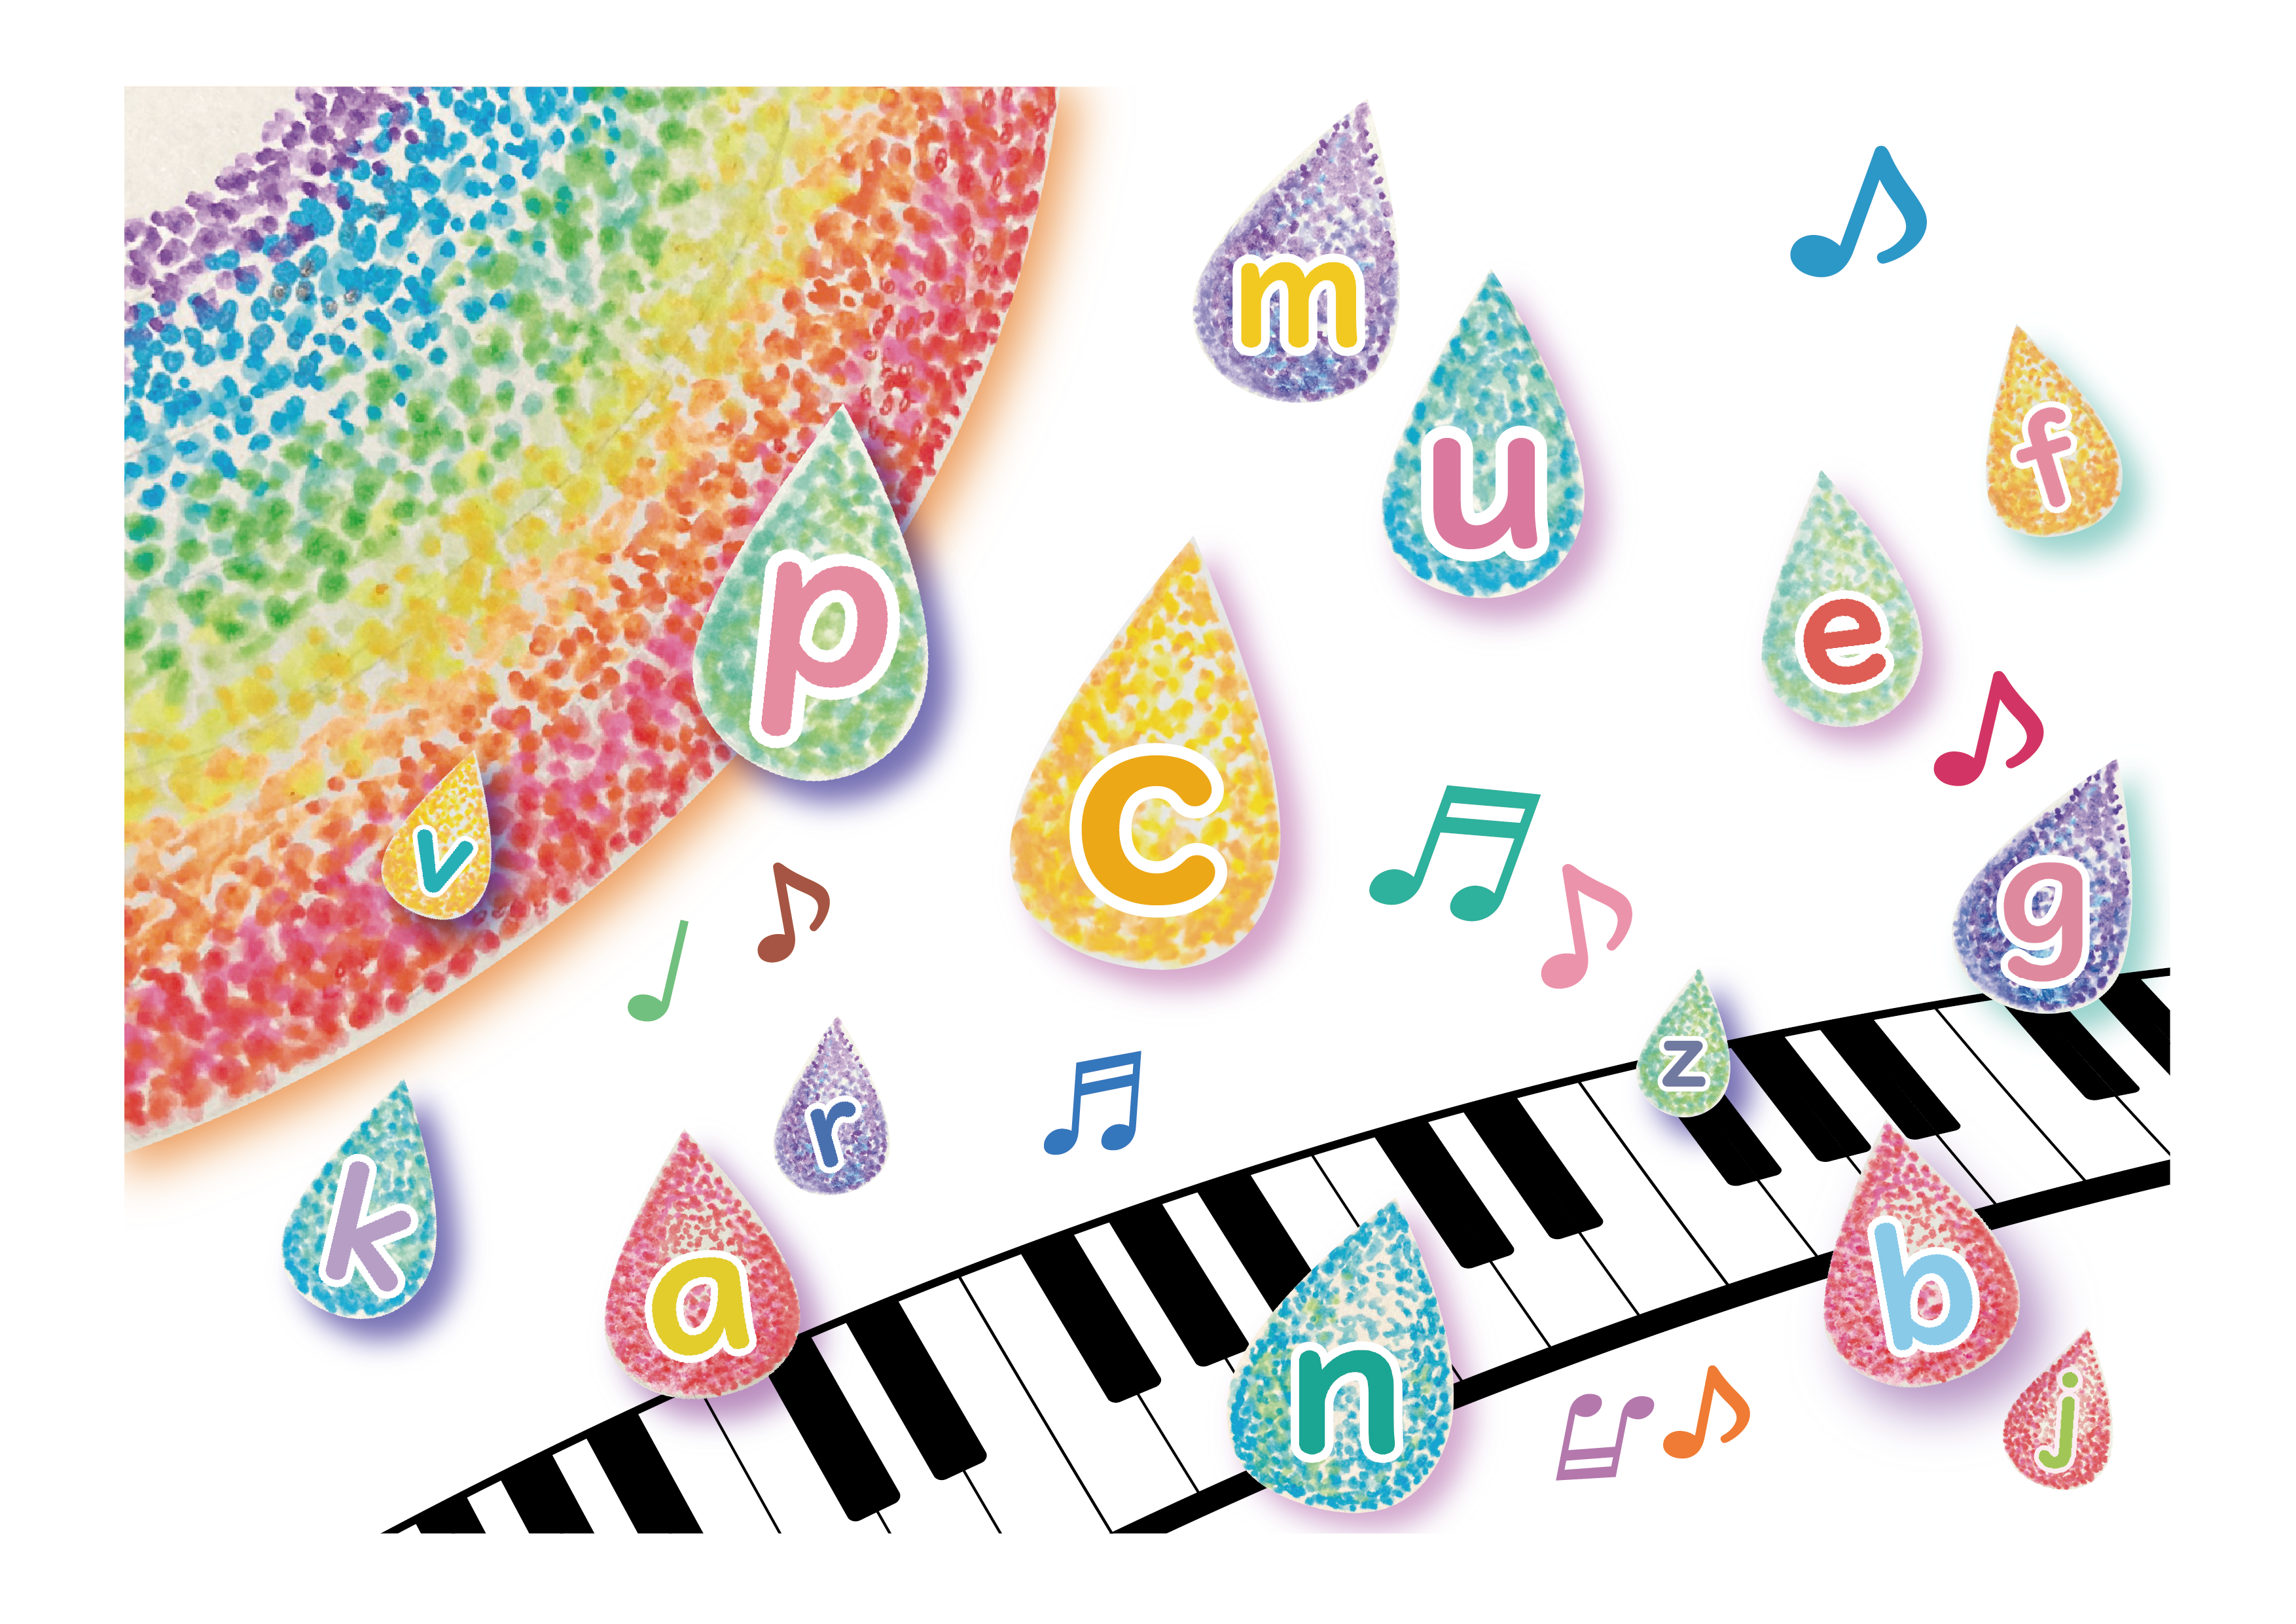
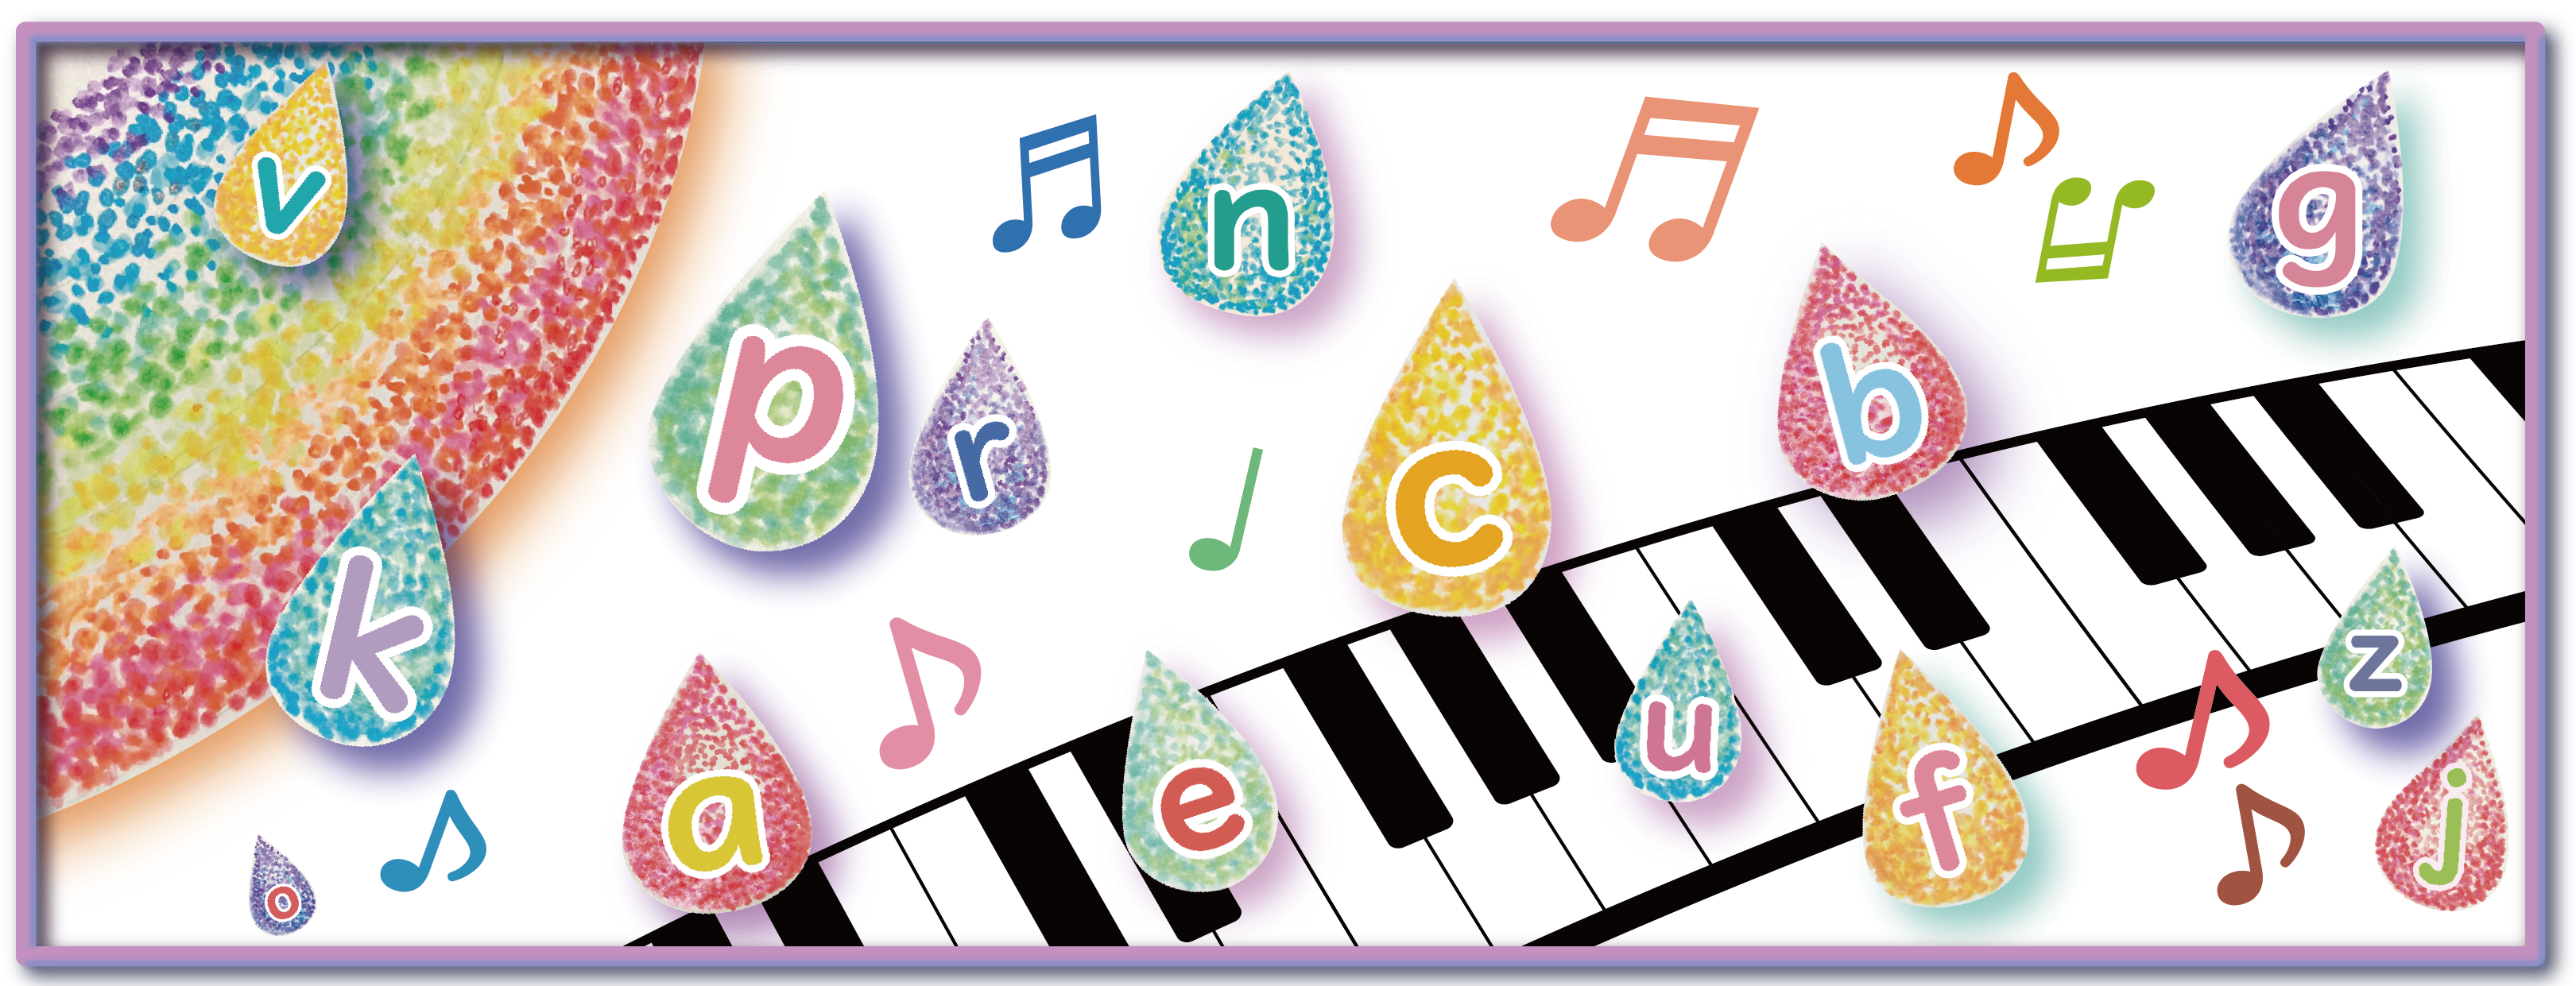
Aims and Objectives
Reading and writing instruction began in elementary schools in 2020. With English education reform affecting everyone from elementary school students to university entrance exams, many teachers and parents in the field are likely feeling anxious.
To help children who have difficulty reading and writing progress smoothly in their English studies, we will introduce teaching methods and examples of teaching materials to build a foundation, as suggested by Professor Mutsumi Iijima of the University Education Center at Gunma University.
Furthermore, font manufacturer Morisawa will follow up on the teaching material ideas based on Professor Iijima's theory of "9 Stages," which is tailored to the progress and required abilities of English language learners based on his experience, with the aim of sharing English language learning materials free of charge under the supervision of Professor Iijima to everyone involved in English education, under the guidance of the font manufacturer Morisawa, in the form of UD fonts.
Recently, there has been a lot of discussion about the differences in various learning styles and teaching methods that suit them, but these teaching materials will be effective for many children who have these various learning styles. We hope that they will be widely used and used as reference in educational settings.
The teaching materials (PowerPoint/PDF) introduced in this article can actually be downloaded and used. After completing a simple registration form using the materials download form below, you will be directed to the download page. (Once you register, your input will be saved for future use.)

Mutsumi Iijimateacher
Professor, University Education Center, Organization for Higher Education and Student Support, Gunma University
Master's degree in TESOL from the University of Birmingham, UK
Graduate School of Human Sciences, Osaka University, Doctoral Program, Completed all required credits and withdrew
Publications etc.
"English Learning Support for Children and Students with Reading and Writing Difficulties," English Education, April 2019 - March 2020, 2019-2020, Taishukan Shoten
"First Elementary School English: Creating Lessons that are Easy for All Children to Learn from the Perspective of Special Needs Education" by Midori Otani, Mutsumi Iijima, and Kazuaki Tsuchimichi, 2020, Meiji Tosho
"Universal Design for Elementary School English: Learning through Multiple Senses" by Takeda Keiichi (editor), Iijima Mutsumi, Murakami Kayoko, Miki Sayuri, and Yukioka Nanae (authors), 2020, Meijitosho, and others.
Phonological awareness and letter-sound ability in language learning
The teaching methods and teaching materials introduced on this website are intended to foster awareness of the relationship between letters and sounds, which is fundamental to English learning, and to foster phonological awareness.The teaching materials will be distributed based on the "9 Stages" that correspond to the progress of English learning content.
Stage 1. Learn the sounds of English!
It is important to clearly show the differences between sounds and letters in Japanese and English. Children learn Roman letters in the third grade of elementary school, but surprisingly, they begin to come into contact with the alphabet without understanding the significance of learning Roman letters, under the curse (??) that "if I can't read Roman letters, I can't read English." After all, the first step is to develop an image of the sound (phonological representation)*1I think it is necessary to start learning English by properly inputting the following:
*1 Phonological representation: the sounds of language formed in consciousness
Stage 2. Get used to English sounds and letters!
In today's society, children are surrounded by an abundance of English words in their daily lives. Some words have been adapted into Japanese and are now used in ways that differ from their original English meanings, but there are still many English words that children are familiar with from an early age and have already input into their "comprehension vocabulary" and "usage vocabulary." Using these English words that are already part of their knowledge, we aim to review and input English sounds, and identify English sounds and alphabet letters.
Stage 3.English vocabulary learning
When middle and high school students are asked about the difficulties they face in learning English, many respond, "I can't remember English vocabulary." This is where memory issues come into play, but if we can understand the mechanisms of remembering things, rather than simply retaining information, and use vocabulary learning methods that are tailored to the learner's cognition and preferred learning style, it may become a little easier to tackle the painful task of vocabulary learning.
Stage 4English word arrangement
Even if learners can memorize English vocabulary, there are many who say, "I don't know how to use it." What kind of teaching and learning methods can help students master the word order in English, which is different from Japanese? This is an area where Japanese, being the first language, can interfere.
Stage 5How to read English sentences
Some learners can read and understand simple English sentences, but find it difficult to understand complex or compound sentences, or even long sentences. The difficulty with complex or compound sentences is related to the acquisition of conjunctions. When it comes to long sentences, short-term memory*2, working memory*3, and logical thinking skills are also involved. What learning methods are particularly effective for learners with weak working memory?
*2 Short-term memory: Memories that are retained for tens of seconds to tens of minutes, and are transferred to long-term memory by repeatedly memorizing them.
*3 Working memory: A type of short-term memory that temporarily stores and processes information needed for thinking, making decisions, etc.
Stage 6How to listen to English sentences
Not only in English, but also in Japanese, a large number of learners have a strong sense of difficulty with the activity of "listening." Many teachers believe that "it's difficult to understand just by listening," so they provide visual information in addition to auditory information to make instruction easier to understand. So, what are some learning methods to strengthen English listening skills?
Stage 7How to speak in English
The ability to output English is one of the key focuses of the current English education reform. There are different stages of "speaking" ability. There are various stages, such as having an everyday conversation with two people, or expressing your opinion to a large group of people. The former is also related to Stage 8, so we will leave that for now and focus on the "speaking" ability required for one-sided communication.
Stage 8How to speak in English (interaction)
As mentioned in Stage 7, the activity of "speaking" involves someone listening. Furthermore, there is feedback from that listener, and a circle of "interaction" is created. This is communication. "Interaction" requires not only linguistic ability, but also social language ability to read the other person's intentions and situation. Some learners may find the activity of "interaction" itself a burden. In such a situation, what kind of learning activities can be considered?
Stage 9How to write English sentences
Writing in a second language requires an extremely advanced skill. In the field of writing research, even one's native language is considered something that should be properly taught. I believe it is important to properly understand the process of writing and then guide students through the process step by step. Furthermore, it is essential to carefully define the steps of the process and ensure that the steps are of a reasonable level of difficulty for learners as they progress through their studies.
The contents of each stage will be added from time to time.
For updates, please check our official social media accounts (X *formerly Twitter/Facebook).
It is important to clearly show the differences between sounds and letters in Japanese and English. Children learn Roman letters in the third grade of elementary school, but surprisingly, they begin to come into contact with the alphabet without understanding the significance of learning Roman letters, under the curse (??) that "if I can't read Roman letters, I can't read English." After all, the first step is to develop an image of the sound (phonological representation)*1I think it is necessary to start learning English by properly inputting the following:
*1 Phonological representation: the sounds of language formed in consciousness
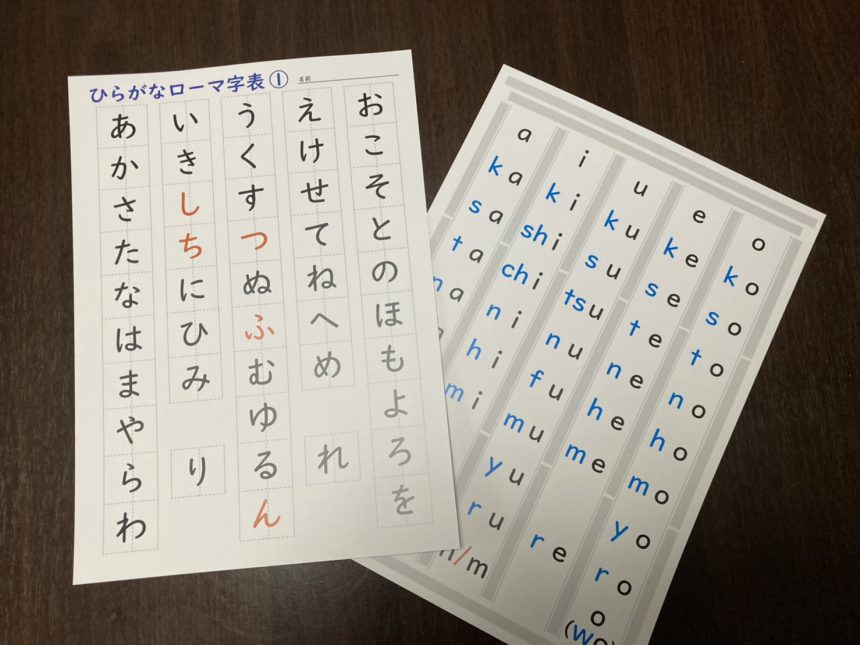
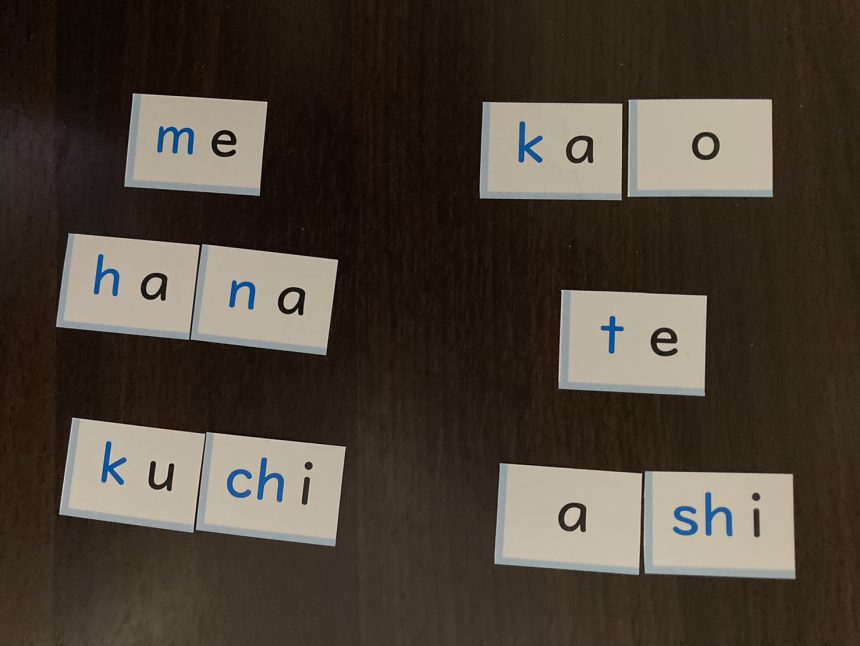
Teaching materials: "Romaji Poster" and "Romaji Cards"
Explanation of how to use the Romaji poster
Problem: It seems that in many cases, students are introduced to "romaji" in the third grade of elementary school without understanding the original purpose of romaji. As a result, it is unfortunate that it does not effectively connect to the study of word sounds and spelling that begins in earnest in junior high school.
the purposeBy becoming aware of the differences in how sounds are formed between Japanese and English through learning romaji, it is hoped that students will become more familiar with the structure of English sounds and will also find it easier to study spelling.
Teaching materials: A poster with a list of hiragana characters such as clear sounds, voiced sounds, double consonants, glottal stops, and palatalized sounds, with a list of romaji (basically based on the Hepburn system) attached below. The hiragana characters above have a slit in the middle so that they open like a double-hung window. When you open the window, the romaji below appears. From the ka row onwards, opening the window on the left will reveal consonants, and opening the window on the right will reveal vowels.
Steps for making a Roman alphabet poster
① Print out the Romaji poster PDF on thick paper.
(Available in color and black and white)
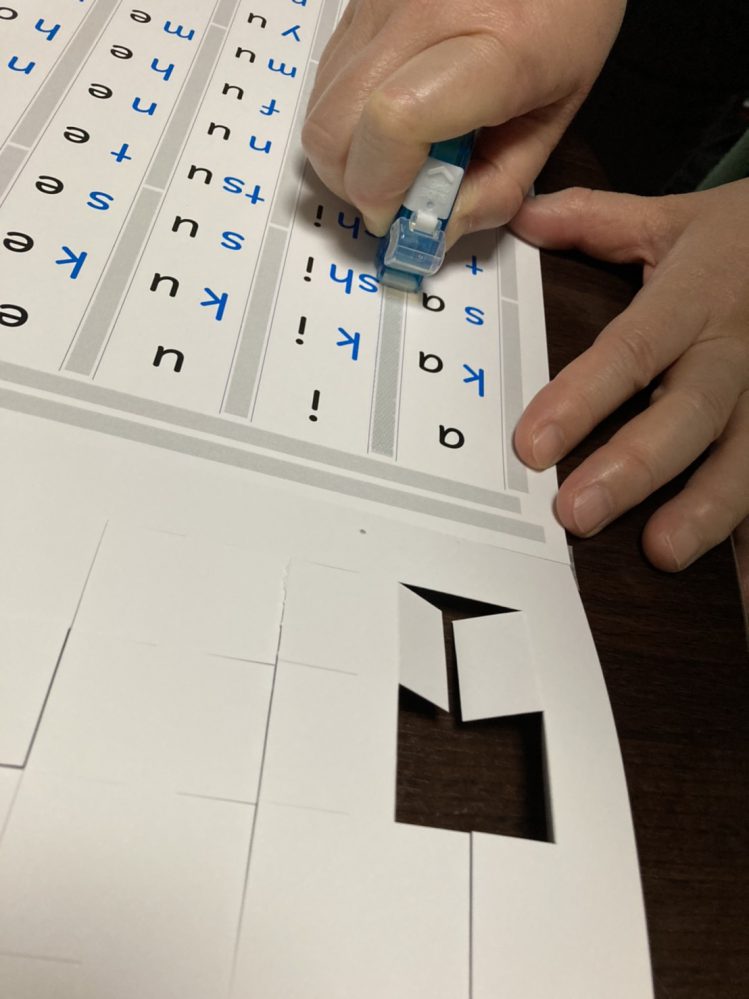
② Use a cutter to cut along the dotted lines on the paper with hiragana written on it.
(The solid lines will be bent later, so do not cut them off.)
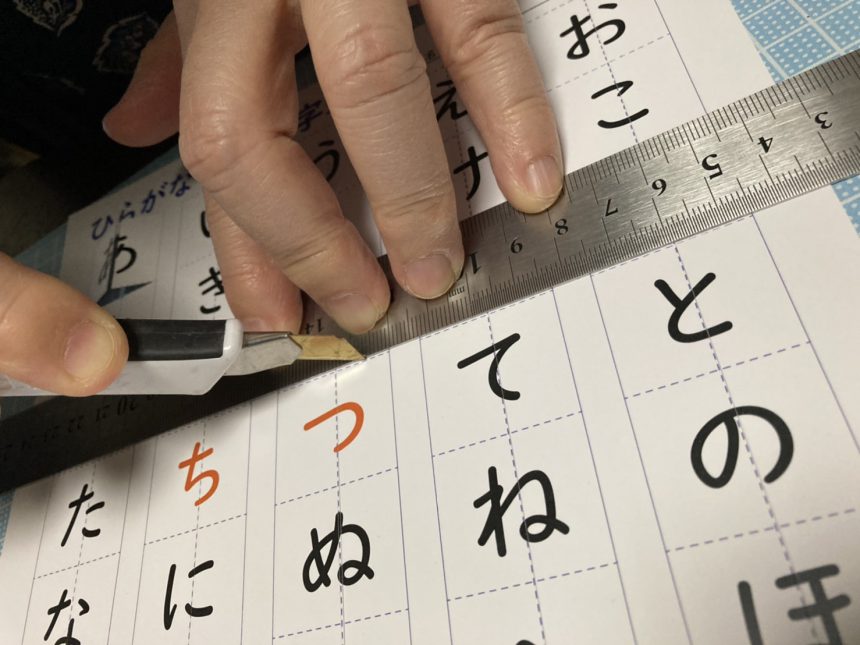
③ Place the hiragana and romanized letters on top of each other so that they line up perfectly, and temporarily secure the top with masking tape.
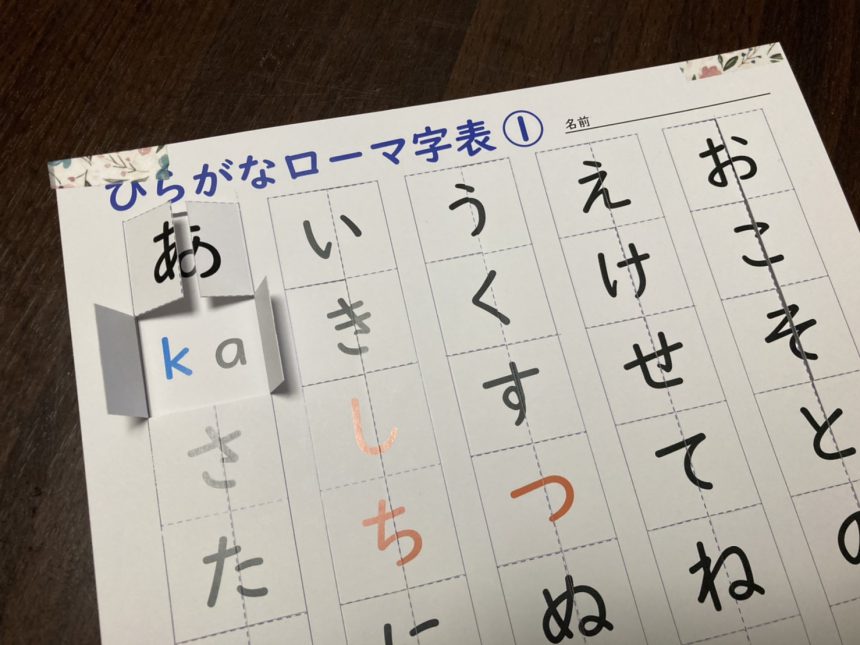
④ Apply double-sided tape or adhesive tape with a width of 6mm or less to the gray "glue margin" where the Roman letters are written, making sure that the adhesive does not spill out.
(Please note that if the door extends beyond the gap, it will not open.)
⑤ Carefully paste the hiragana and romaji papers together so that they do not shift.
⑥ Open the door to Hiragana
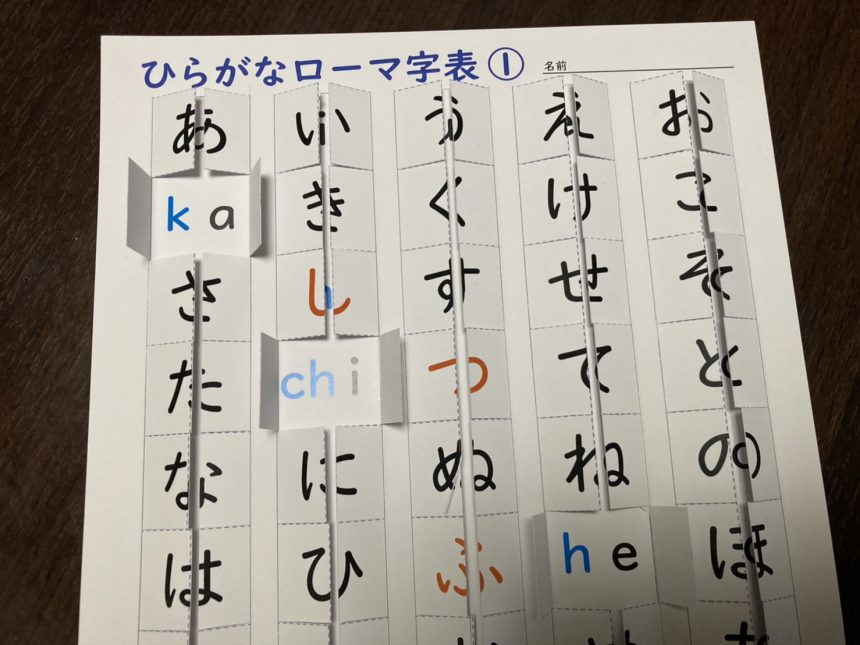
Instructions: Please watch the video below.
Explanation video
1) PDF of the "Romaji Poster"
(The card will change to Roman letters when you open the kana door.)
2) PDF of "Romaji Cards" (color/black and white)
Make a double-sided copy and cut along the solid lines of the hiragana. Turn it over to reveal the romanized version.
3) Teaching support materials that can be used to show this in PowerPoint
In today's society, children are surrounded by an abundance of English words in their daily lives. Some words have been adapted into Japanese and are now used in ways that differ from their original English meanings, but there are still many English words that children are familiar with from an early age and have already input into their "comprehension vocabulary" and "usage vocabulary." Using these English words that are already part of their knowledge, we aim to review and input English sounds, and identify English sounds and alphabet letters.
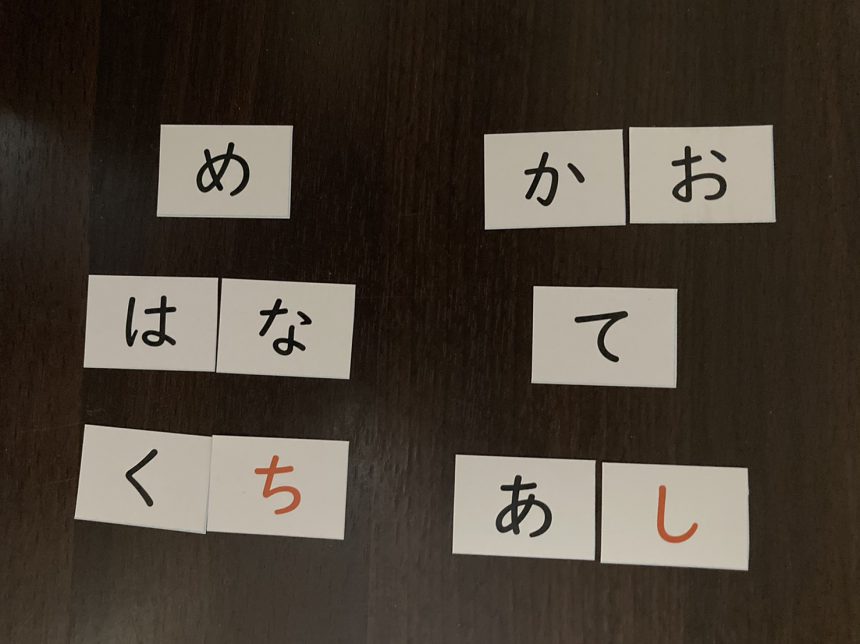
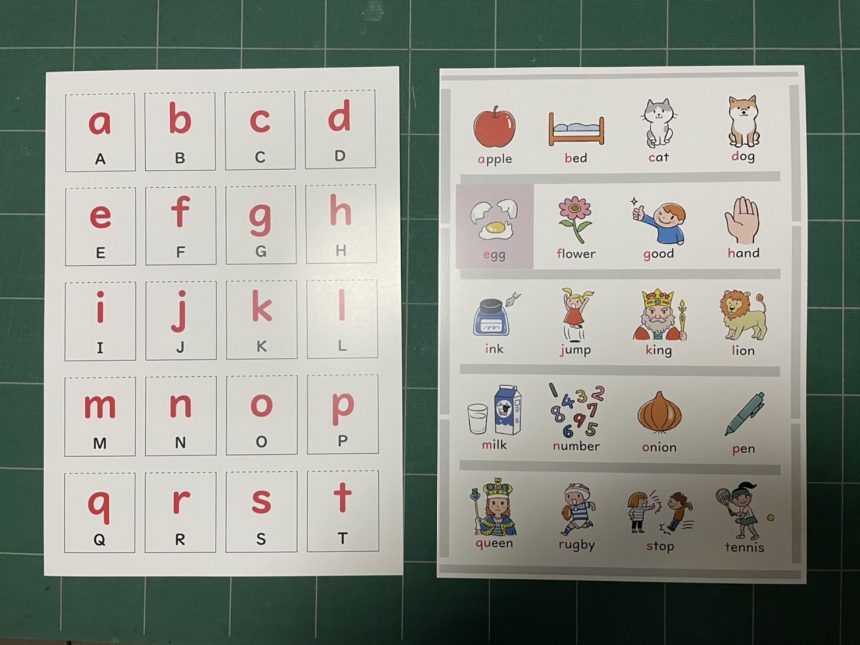
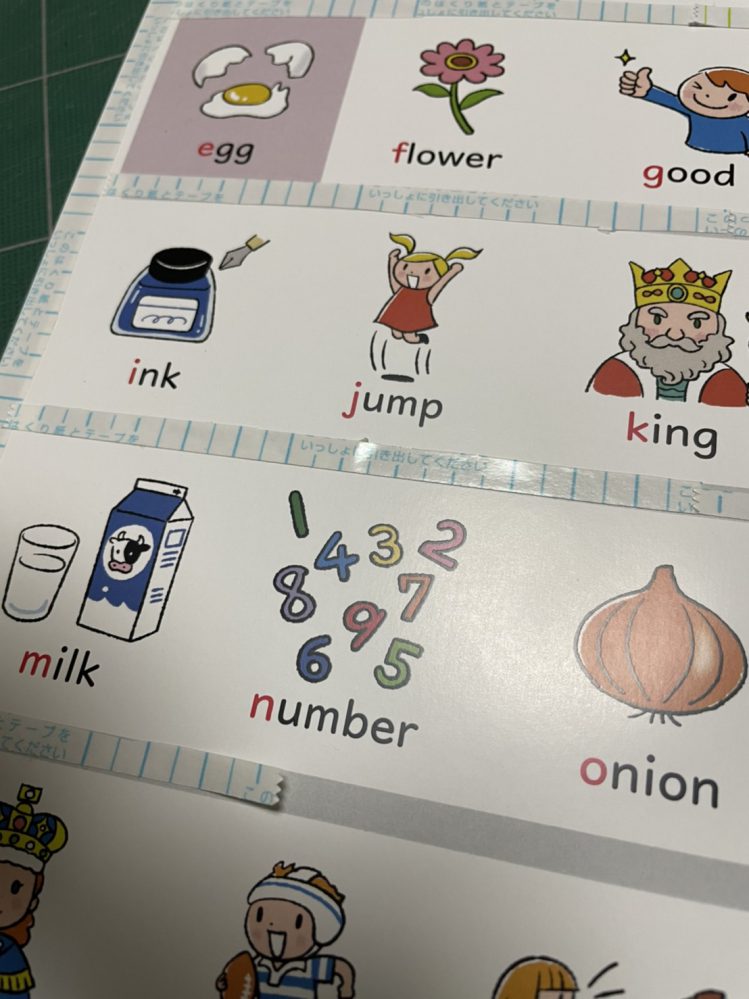
Material 1: "English Vocabulary Picture Cards" and "English Vocabulary Sound Matching Game Cards"
1) English Vocabulary Picture Cards
2) "English Vocabulary Sound Matching Game Cards"
*The "English Vocabulary Picture Cards" and "English Vocabulary Sound Matching Game Cards" are designed to be printed on both sides. The front and back are designed in the same position, but depending on the specifications of your printer, the positioning of the front and back may differ.
3) Lesson support materials that can show "English vocabulary picture cards" in PowerPoint
*The PowerPoint data for "English Vocabulary Picture Cards" allows you to show each card individually.
Card 30 uses the illustration of a "bed" to explain the orientation of the often confused "b" and "d" letters, and cards 44-46 explain how children can write their favorite words on blank cards.
Please check the slideshow and use it as needed.
*The PowerPoint data is approximately 43MB in size, so please be aware that it may take some time to download and you should be careful about the amount of free space you have.
Explanation of how to use "English vocabulary picture cards"
Problem: Think about how you acquired your native language, Japanese. Shortly after birth, babies are constantly showered with Japanese language spoken by those around them. Imagine a kitchen bowl entering your head. The shower of Japanese language continues to build up, and the surface tension causes the water level to rise. The next moment, the surface tension is released and the accumulated water flows out all at once. This is the moment when the baby utters something resembling words. From this point on, babies continue to be exposed to the Japanese sounds that surround them. As a result, a phonological representation of Japanese (an image of the sounds of Japanese) naturally forms in their heads. After this phonological representation is formed, learning characters begins.
This phonological representation is extremely important in acquiring language. If letters are introduced where there is no phonological representation, there is a risk that the letters will become symbols that are not associated with sounds. Take sufficient time to first solidify the phonological representation in your child's mind.
the purposeHere are some examples of activities that help children solidify the relationship between letters and sounds of the alphabet using English words that they are already familiar with in their daily lives. Although this is a type of phonics, the primary goal here is to familiarize children with the sounds of English, and learning letters is not the main activity. By using English words that are already in their memory and giving them sounds that are as English as possible, the aim is to help them acquire a phonological representation of English (an image of the sounds of English).
About "English Vocabulary Picture Cards"
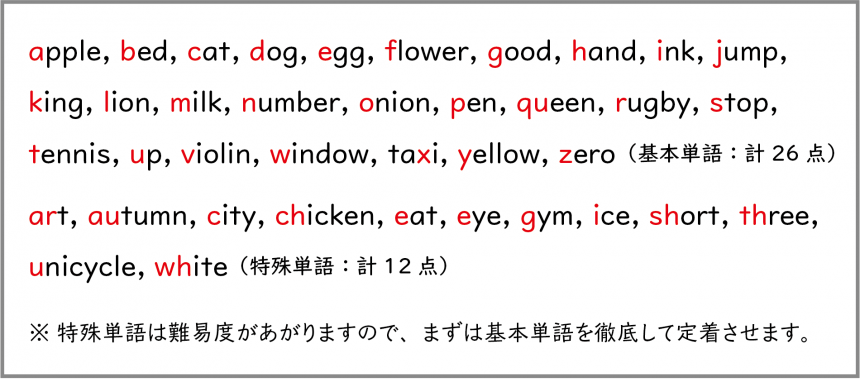
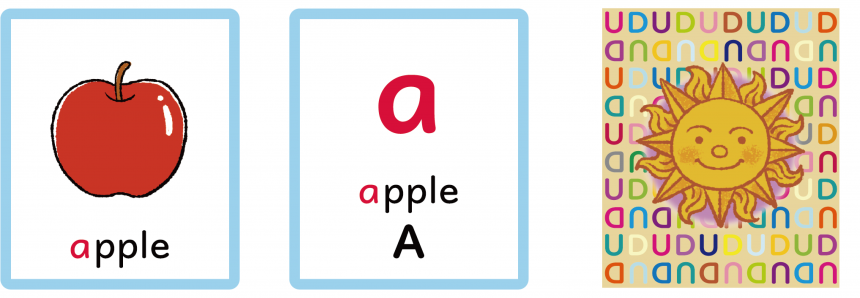
Teaching materials: There are several phonemes in one alphabet. We have selected one word with basic pronunciation for each alphabet so that children can get used to the letters and words they already know. First, introduce these basic words, and once they have mastered them to a certain extent, introduce special words with other phonemes. (Instruction 1(See reference) On the back side, only the basic alphabet is displayed. (Instruction 2(Example: a... There are other words such as apple, art, autumn, etc., but we will first focus on the pronunciation of apple.)
*If you are making this together with children, you can have them choose the words. In that case, please use blank cards.


*Illustrations provided by Nozomi Kudo: She has published books such as "One Pencil! Easy Illustration Practice Book" (Hobby Japan) and is currently active in illustrating manga, advertisements, picture books, and more, focusing on cuts of animals and children.https://room226.jimdofree.com/
* The front of the special pronunciation word cards has a pink frame, and the back has a pink asterisk (*) printed to the right of the capital letter. After the basic cards have been mastered, please use them with the special pronunciation words.
Instruction 1 Show the table of "English Vocabulary Picture Cards."
Teacher: What's this?
Student: Apple
Teacher: That's right. Now, listen carefully to what I say and imitate it. Please follow along. a, a, apple (The important thing is to exaggerate the English sounds.)
Student: a, a, apple
Teacher: a, a, apple (repeat several times to make sure it sounds more English)
Student: a, a, apple
It is important to get your child used to seeing the picture so that they can speak it naturally. After this, you can start associating letters with sounds.
guidance2 In the above activity, once the child is able to look at the illustration and pronounce the word correctly, the next step is to show the alphabet on the back and have them pronounce the English word.
Teacher: Now, look at just the alphabet written on the previous card, remember the illustration on the front, and say the word out loud. First, let's look at the illustrations together and go through them all. a, a, apple (the activity mentioned above)...
Student: a, a, apple …………
(Once you're done, show the back of your card.)
Teacher: Good job! Now, I'll just show you the alphabet, and then try to remember the pictures and say the words out loud.
(Present the sentences in order, starting from a on the back. First, check with the whole class. Once students are able to do this, gradually move on to individual pronunciation, moving on to rows, pairs, and individuals.)
(Shows the a on the back) a, a, apple …………
Practice the words in alphabetical order until they are mastered. Once they are, present them randomly. Tap your feet to help them pronounce the words in a rhythmic way.
Instructional video by Miki Iijima, teacher from Gunma Prefecture
About the "English Vocabulary Sound Matching Game Cards"
This is an application of the "English Word Picture Cards," where you line up the backs and play a game of concentration by matching the letters with the pictures.
When the player matches the picture and letter of the same word, they can read "a, a, apple!" and take a card. When all the cards have been taken, the player with the most cards wins.
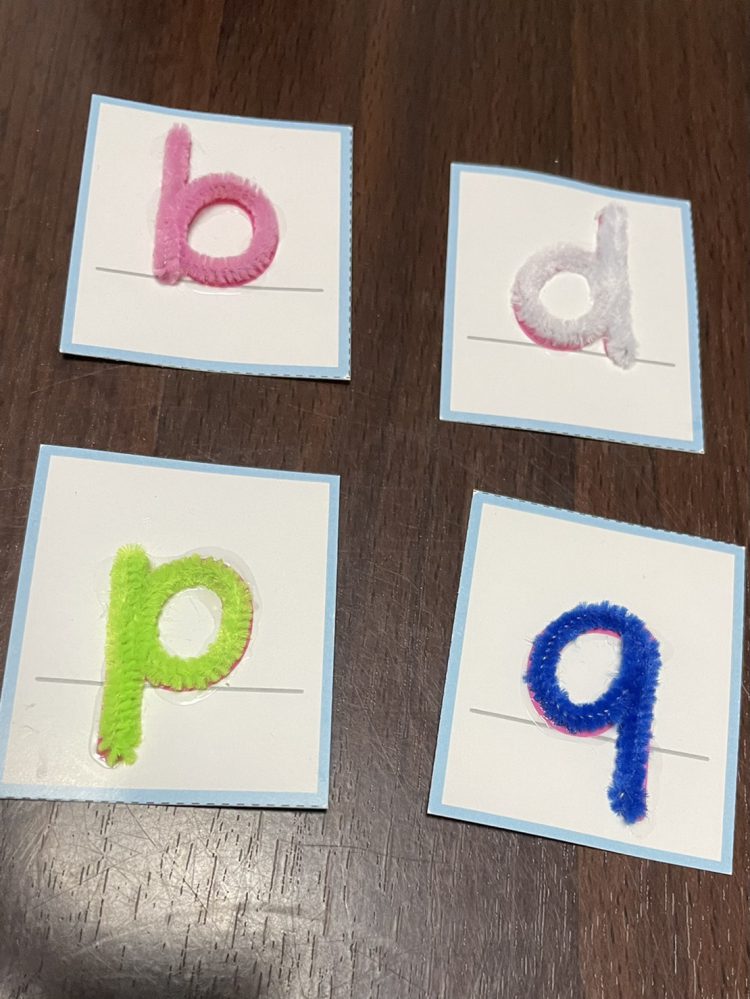
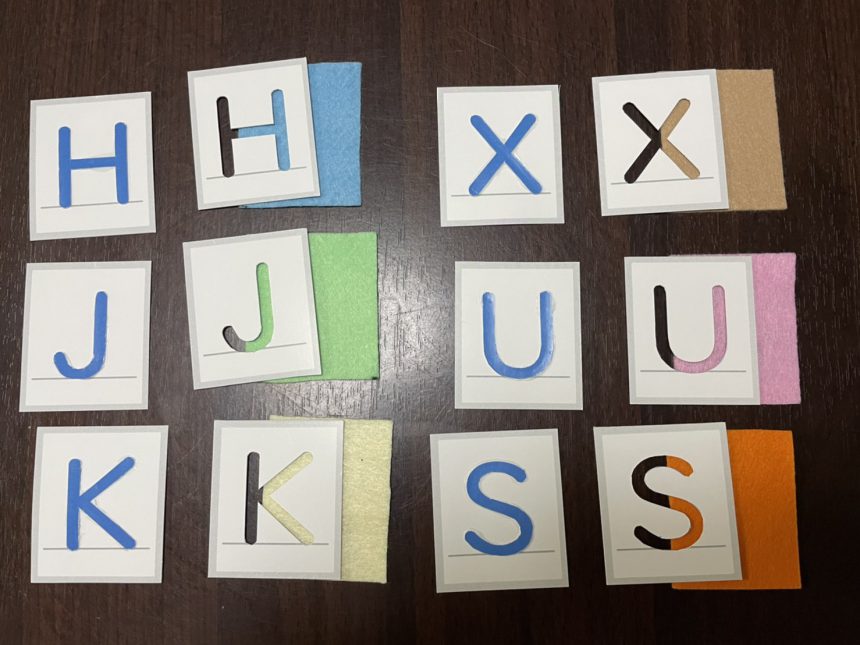
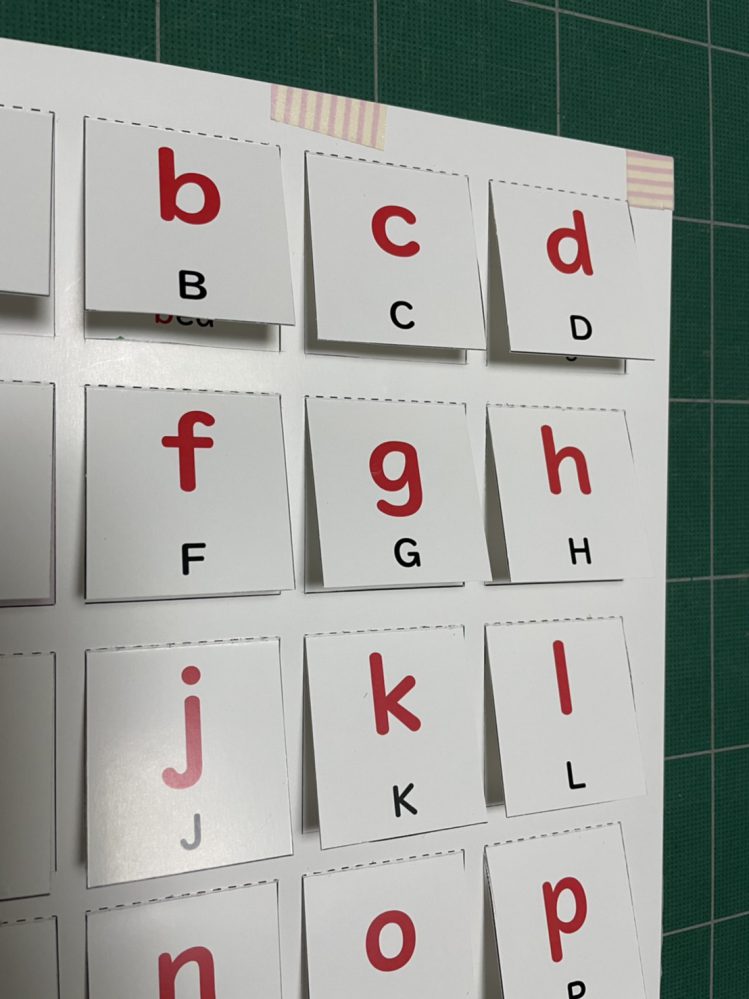
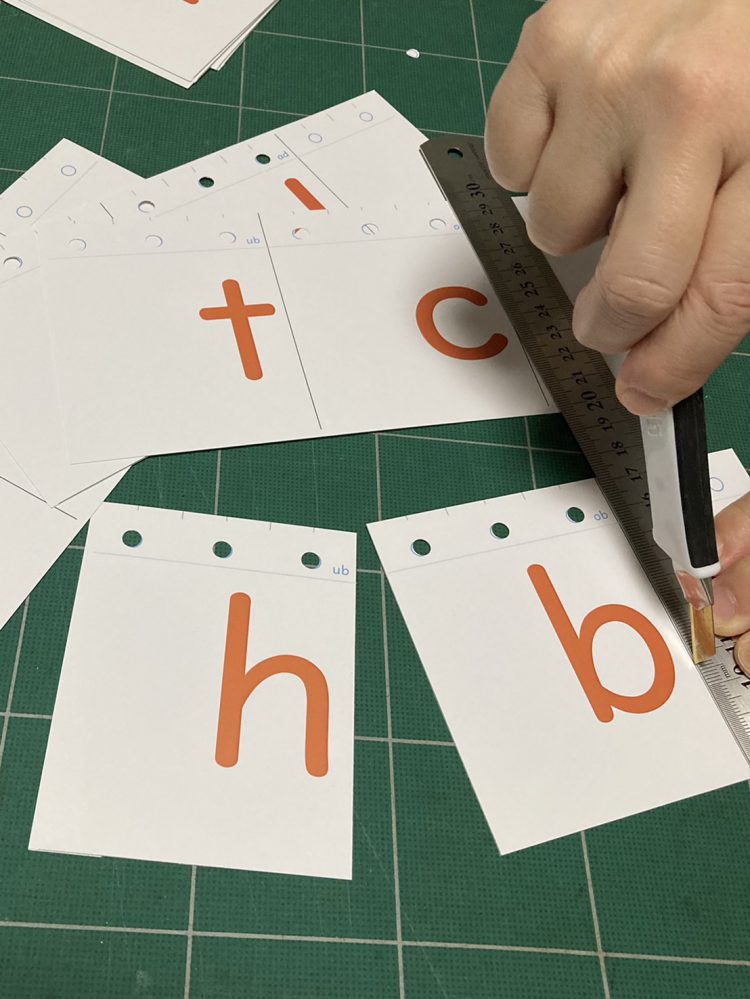
Material 2: "Uppercase and lowercase letter pronunciation cards (molded felt, convex/concave)" and "English vocabulary posters"
1) "Uppercase and lowercase letter pronunciation cards"
2) "Sound Card Felt Transfer Data"
3) "English Vocabulary Poster"
How to use the "Uppercase and Lowercase Letter Pronunciation Cards"
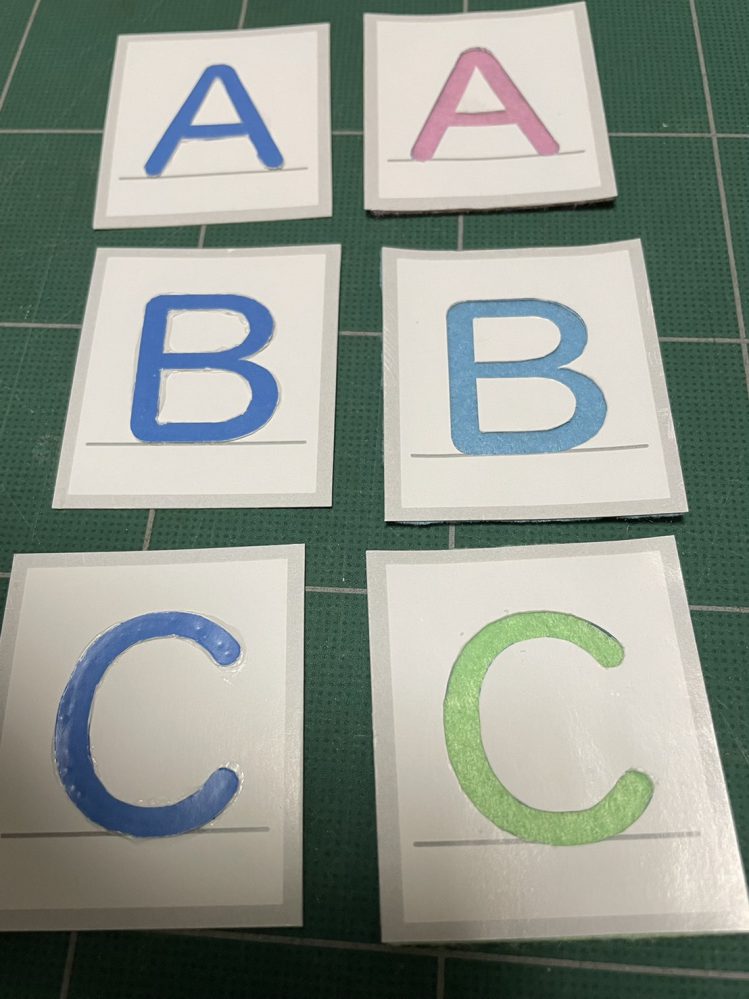
the purposeBy using "English word picture cards" that utilize English words that the children are already familiar with, we were able to connect English sounds with images. The next step was to identify letters with the phonological images (phonological representations) of the input English words. Children who had difficulty learning katakana in first and second grade are likely to have difficulty mastering the alphabet. However, since "look and write" practice alone is not enough to retain the alphabet, we believe that providing multisensory learning materials as part of individual instruction for such children would be effective. Common methods for multisensory letter instruction include writing letters in sand, making letters out of clay, and tracing letters made out of colored glue with fingertips. Here, we introduce easy-to-make colored glued letter cards and felt letter cards.
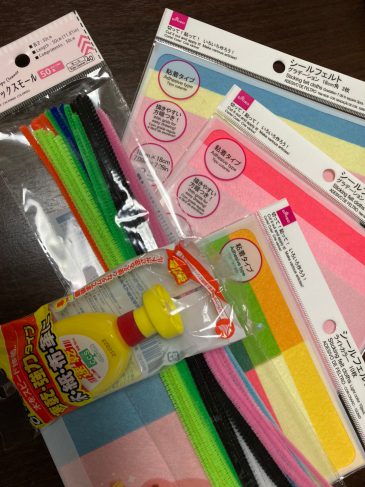
Card making materials 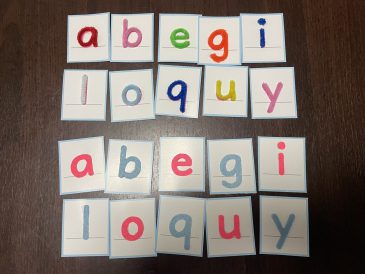
Mould cards and felt cards 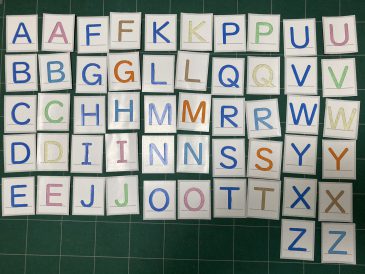
Concave and Convex Card
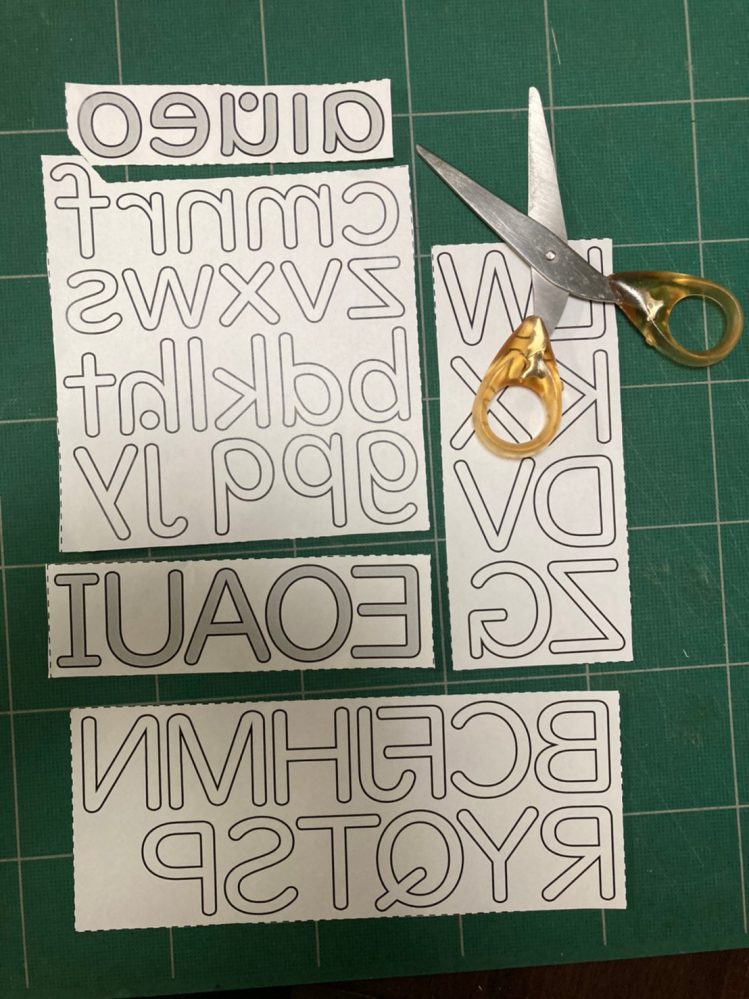
About the "Uppercase and Lowercase Letter Pronunciation Cards"
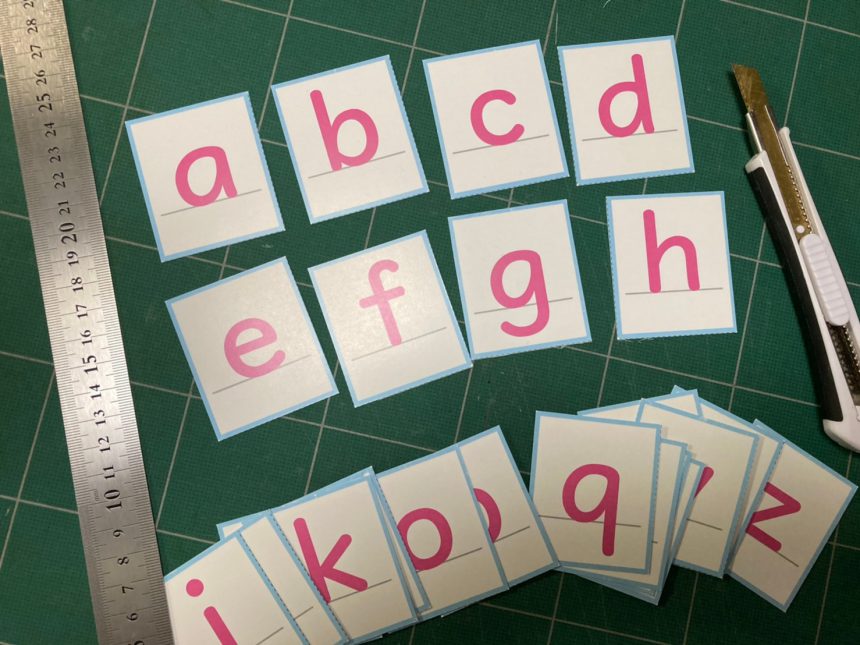
Teaching materials: These cards feature large uppercase and lowercase letters printed on a baseline. When printed on both sides, the front will have lowercase letters and the back will have uppercase letters. Printed on one side, they can also be used as backing for mould cards or felt cards.
Please follow the steps below to create it.
Steps for making uppercase and lowercase cards
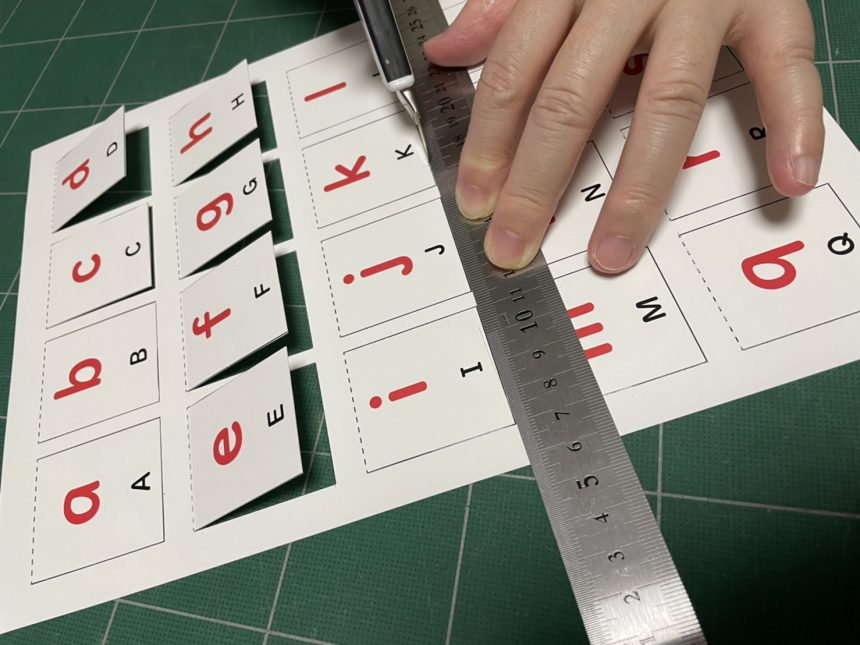
1. Print out the PDF of the uppercase and lowercase letter pronunciation cards on thick paper.
(Available in color and black and white)
*If you are using it as a backing for a mould card or felt card, it may be easier to print it a little larger (A4 → B4).
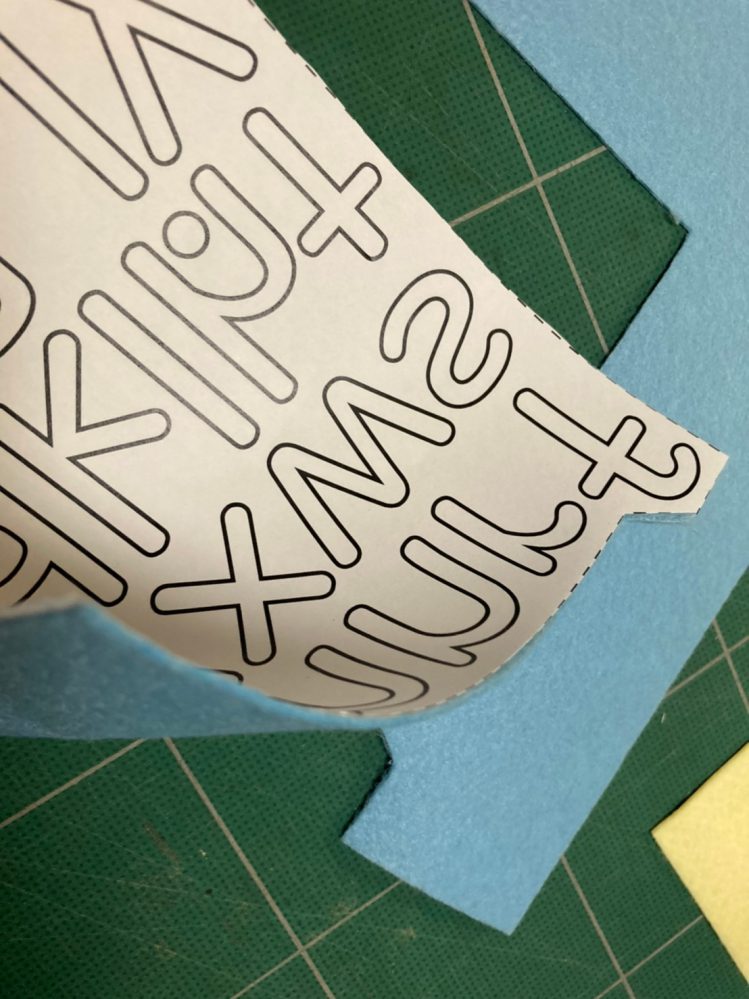
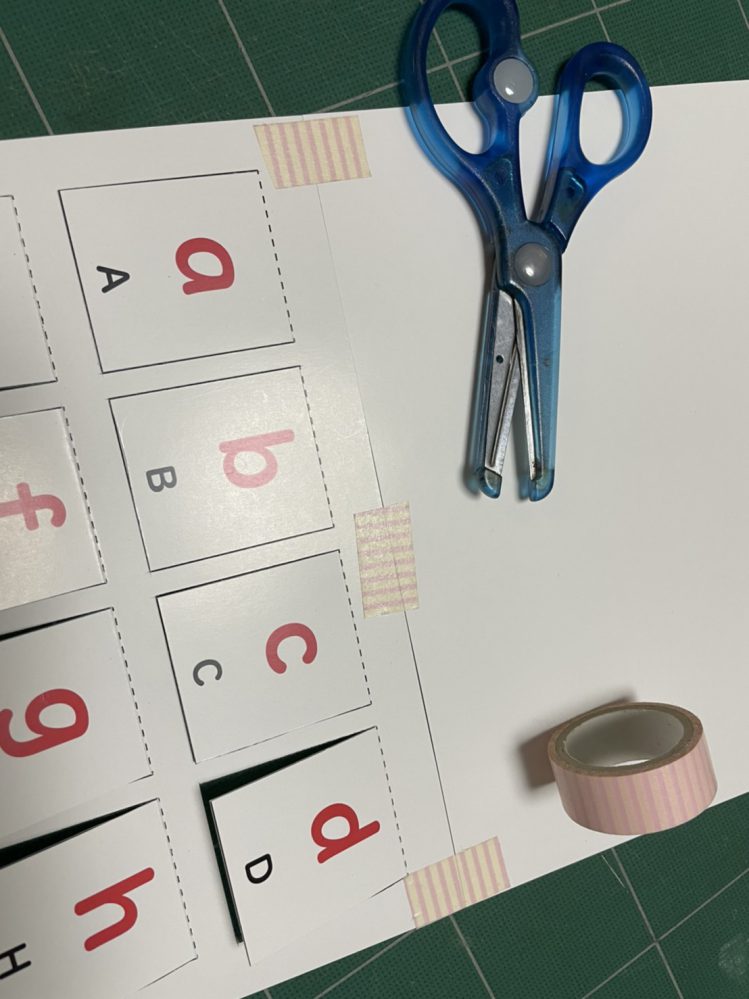
② Use a cutter to cut out the dotted lines on the paper with the lowercase letters.
*If you are printing on one side, the capital letter cards only have outlines, so before cutting them out, lightly draw a line with a pencil or something similar.
Steps for making a mall card
① Make the shape of the card by drawing the mole in one stroke as much as possible to match the shape of the alphabet.
*For lowercase letters, all letters except f, i, j, k, t, and x can be written in one stroke.
*Bend the tip of the cord so that the cut edge does not prick your finger when tracing.
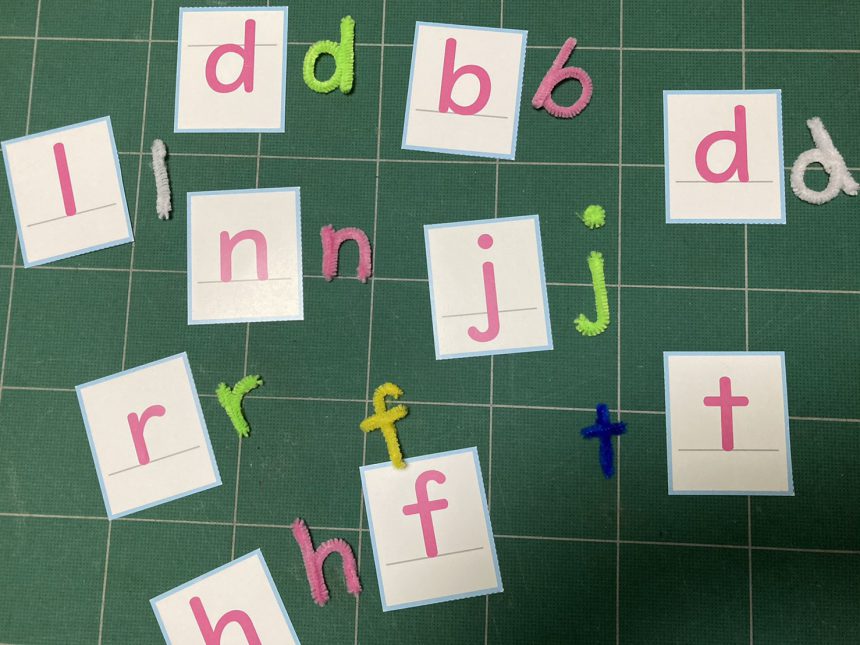
② Apply wood glue along the alphabet shape on the card.
* Be sure to apply the bond to the card (paper) side, not the molding.
*It will become transparent when it dries, so it's okay if it overflows a little.
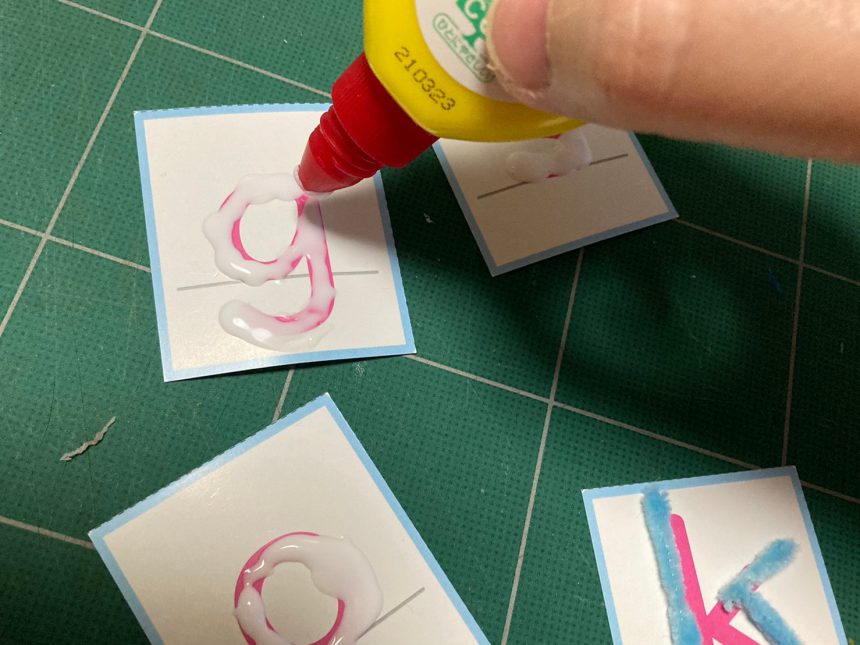
③ Place the card on top of the alphabet and carefully attach it, making sure not to get the top and bottom of the card wrong.
* Place the molding lightly on top of the glue, being careful not to let the glue seep into the molding.
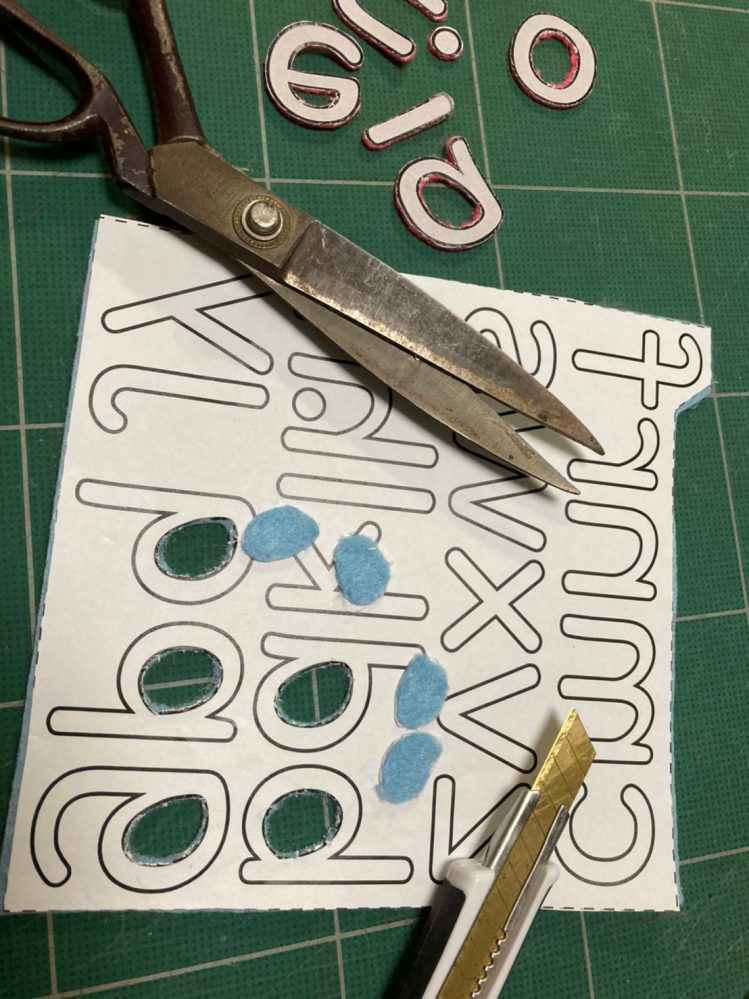
Steps for making a felt card
① Print the felt transfer data onto copy paper (Felt Transfer Print)
*The order of the data for felt transfer is randomly displayed along the shape to avoid wasting felt, and the data is the same size as the "Uppercase and Lowercase Letter Pronunciation Cards," with the letters displayed upside down for transfer.
*If you have enlarged the "Uppercase and Lowercase Pronunciation Cards" that serve as the backing, please enlarge them at the same ratio.
*Vowels are written in gray and consonants in white. Please use two different colors of felt to distinguish them.
② Cut the felt transfer print along the dotted line and cut the sticker felt to the same size.
*It is a good idea to mark the seal felt in advance so that you can cut it to the same size.
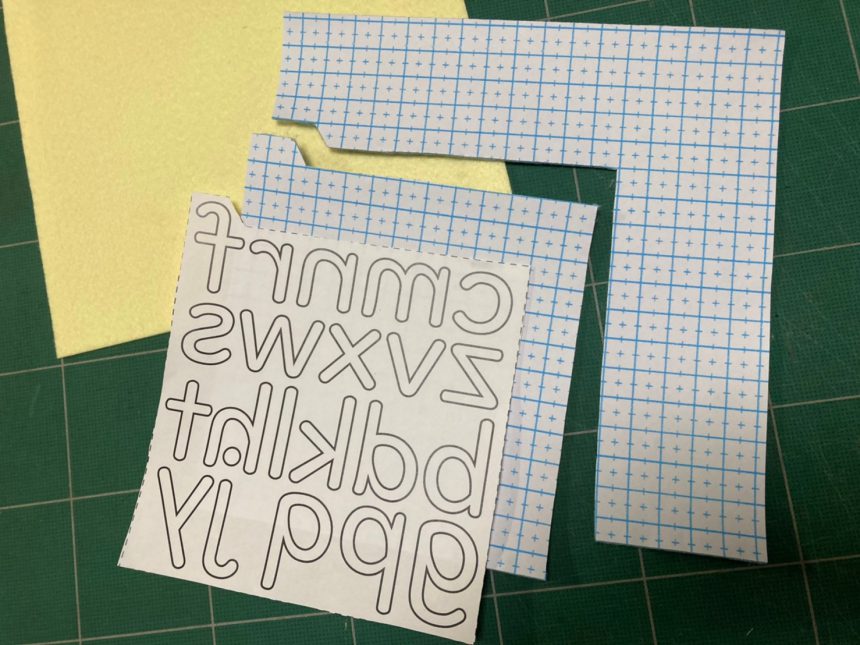
③ Stick the cut out felt transfer print and sticker felt together.
④ Cut along the inverted alphabet shape
*The dot above the "i" is inside the "u", so be careful when pasting it onto the card after cutting it out.
*For a neater finish, first cut out the space inside the letters with a cutter, then cut out the outline with scissors.
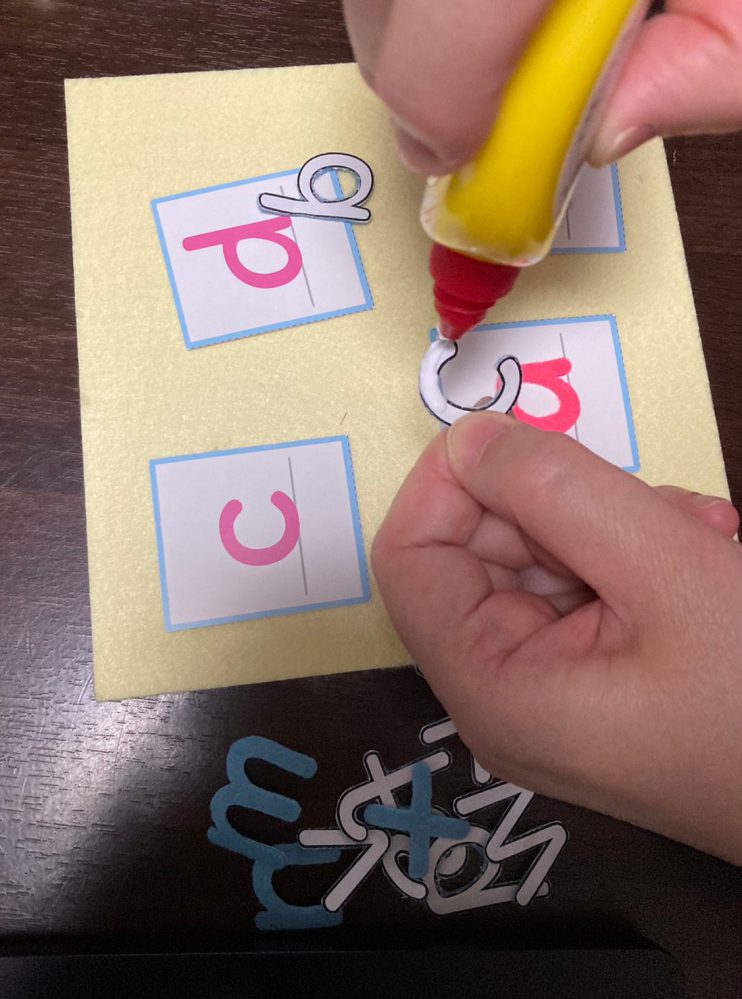
⑤ Apply glue to the paper side of the cut-out alphabet and carefully attach it to the corresponding alphabet on the card, making sure not to misalign.
*The felt transfer print has a mark (down ▼) indicating the bottom, so be sure to attach it to the baseline of the card so you don't get the top and bottom mixed up.
Guidance: Teaching "Mole Cards" and "Felt Cards"
First, repeat the instructions from lesson 1 of "English Vocabulary Picture Cards" out loud, close your eyes, concentrate on your fingertips, and trace your fingers over the colored mole or felt.
Teacher: We've been practicing sounds with the English vocabulary picture cards. Today, let's close our eyes and practice connecting sounds with letters by tracing the letters with our fingers. Let's get started.
Now, let's repeat after the teacher. a, a, apple
Student: a, a, apple …………
Teacher: Change the card to "b" and say b, b, bed
Student: b, b, bed …………
Teacher: Change the card to "c" and say c, c, cat
Student: c, c, cat …………
Once you have practiced, hand over a mole card or felt card with your child's eyes closed.
Teacher: Now, with your eyes closed, can you guess what the letters on this card say?
Student: a, a, apple
Teacher: Yes! That's right! Well done!
By closing your eyes, you can concentrate on the tactile sensation at your fingertips, making it easier to visualize the image in your mind.
This activity helps children solidify the image of letter shapes before they can "write" the letters themselves.
Tip: We introduced two types of cards this time: "mold cards" and "felt cards." However, if you carefully cut out the shapes of the alphabet with a cutter, you can also make embossed cards like the ones in the photo. If you stick the cut-out alphabet on a piece of cardboard the same size as the card, you'll get a convex card, and if you stick the remaining paper cut out on a piece of felt of the same size, you'll get a concave card. Please use them in a way that suits the situation on site.
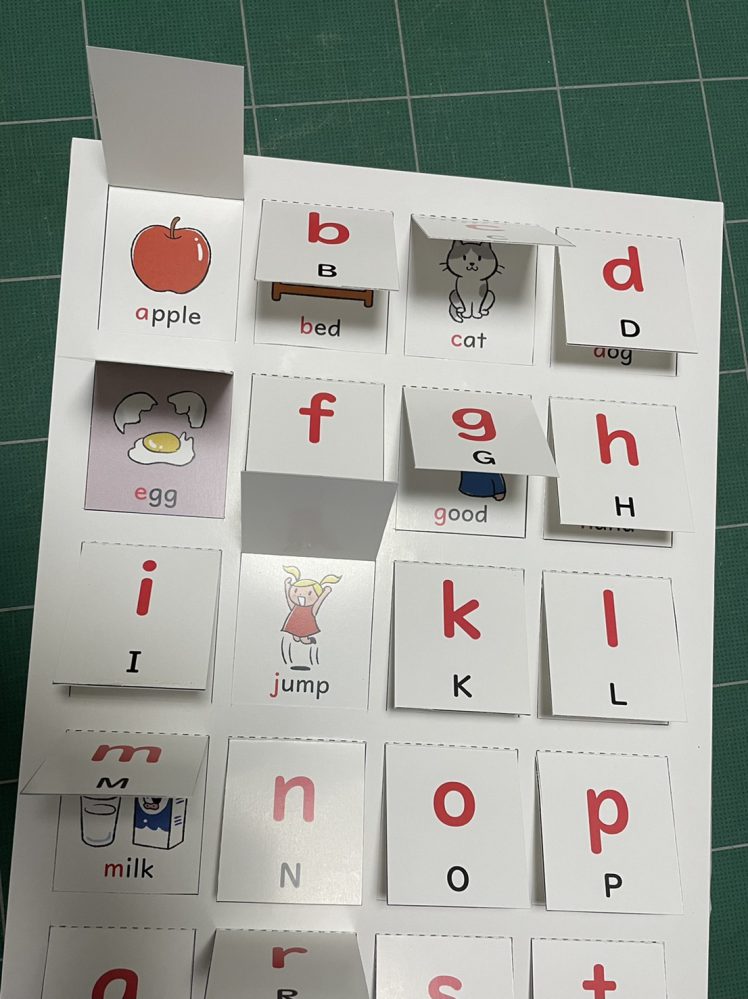
About the "English Vocabulary Poster"
Applying the "English Word Picture Cards," read "a, a, apple!" and open the door.
Enlarge the sheets to A3 size and put them up in the classroom, so that children can learn them while playing during recess.
Steps for making an English vocabulary poster
① Print out the PDF of the English vocabulary poster on thick paper.
② Use a cutter to cut along the solid lines on the paper with the alphabet written on it.
*The dotted lines will be folded later, so do not cut them off.
*If you are using thick paper, it will be easier to bend if you lightly trace the dashed lines (fold lines) with the back of the cutter.
③ Place the alphabet and the illustration of "Toshi" on top of each other, and temporarily secure the top with masking tape.
④ Apply double-sided tape or tape with a width of 6mm or less to the grey "glue margin" area shown in the illustration, making sure not to let the adhesive spill out.
*Please note that if the door protrudes beyond the glued edge, it will not open.
⑤ Carefully paste the alphabet and illustration paper together so that they do not shift.
⑥ Open the alphabet door
When middle and high school students are asked about the difficulties they face in learning English, many respond that they "can't remember English vocabulary." This is where memory issues come into play, but if we can understand the mechanisms of remembering things, rather than simply retaining information, and use vocabulary learning methods that are tailored to the learner's cognition and preferred learning style, it may become a little easier to tackle the painful task of vocabulary learning.
The memory mechanism has three steps: phonological encoding, retention, and retrieval. Even if you simply say, "I can't remember English words," it is necessary to first identify which step you are having trouble with.
Stage 3-1: Turning English words into sounds: Phonological encoding
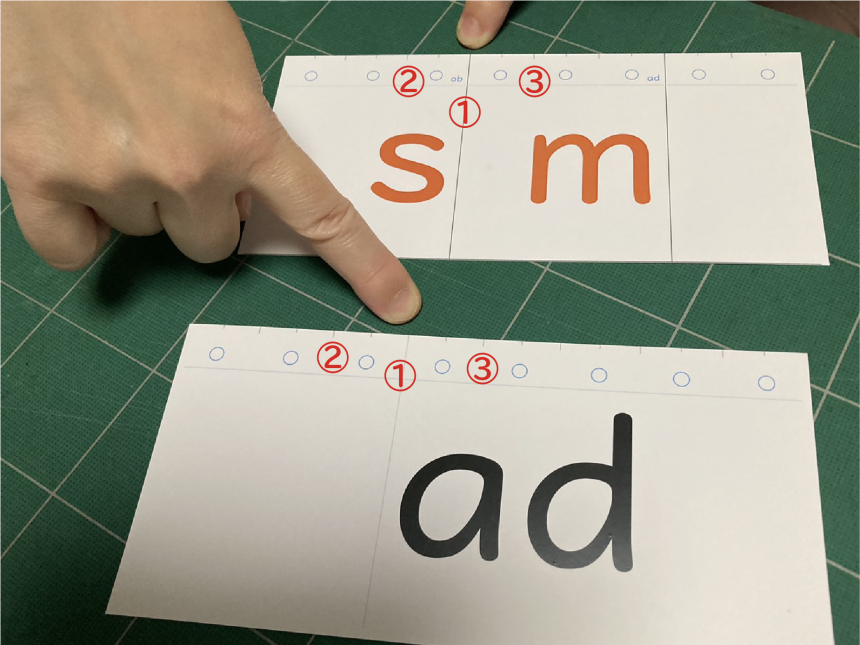
In Stages 1 and 2, we reviewed the letters of the alphabet and phonemes. Here, we will use onset rhymes to learn more English-like sound clusters, sound clusters that appear frequently in English, and aim to be able to read unfamiliar words. However, we will teach irregular readings and silent letters (letters that are spelled but not pronounced) after the basics have been mastered. First, let's start with the very basics.
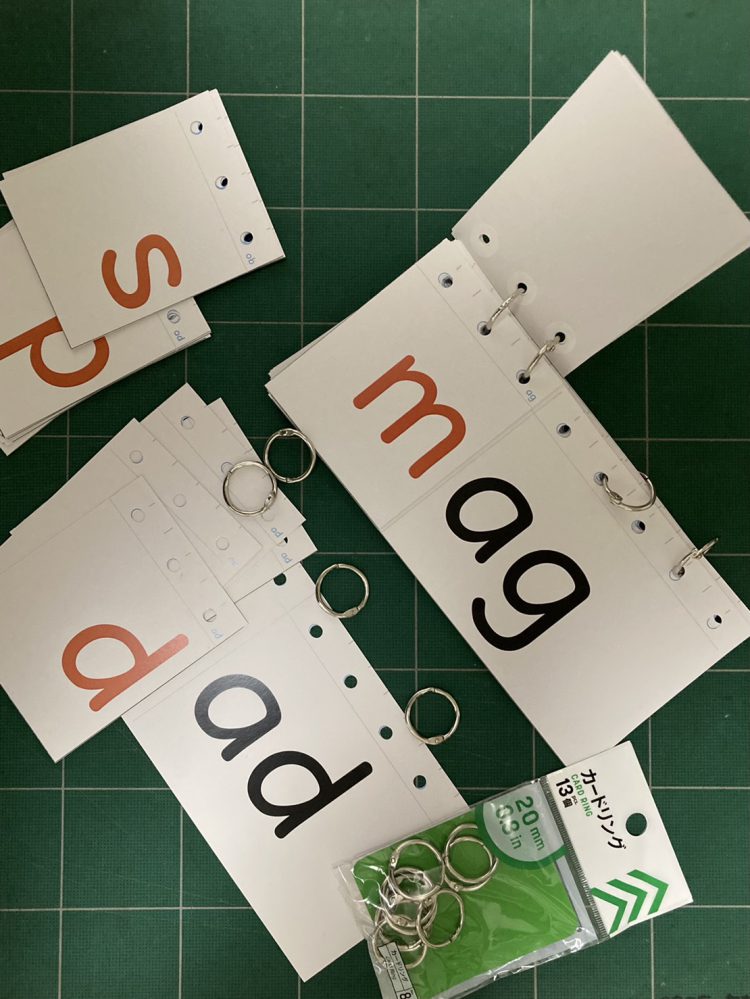
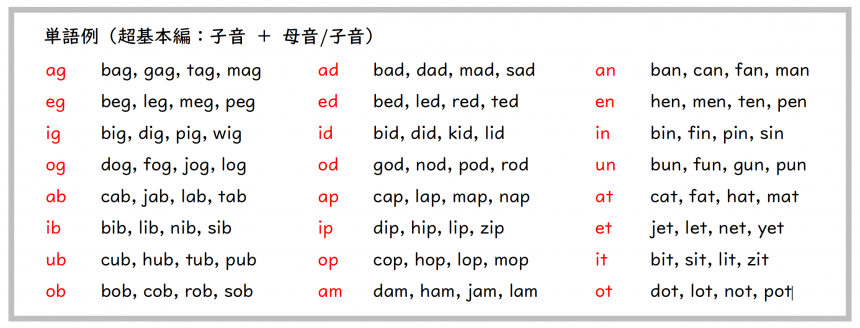
Material 1: Onset Rhyme Cards (Super Basic: Consonants + Vowels/Consonants)
Teaching materials: Onset Lime Card
The cards show the onset (the consonant at the beginning of the word) on the left and the rime (the vowel and rest of the word that follows the onset) on the right. First, students review the onset phonemes, then practice the rime sound repeatedly with their teacher, and then practice connecting the onset and rime sounds.
*We will use as simple English words as possible, but the purpose is to get used to the sound connections that frequently appear in English, so it's okay if you don't understand the meaning.
(Example: Onset b + Lime ag → Onset & Lime bag / Onset g + Lime ag → Onset & Lime gag)
Steps for making Onset Lime Curd
1. Print out the PDFs of the onset cards (16 cards) and lime cards (8 cards) on thick paper (color and black and white versions are available).
② Cut the black horizontal lines with a cutter and divide into thirds
※ Do not separate the vertical lines at this point.
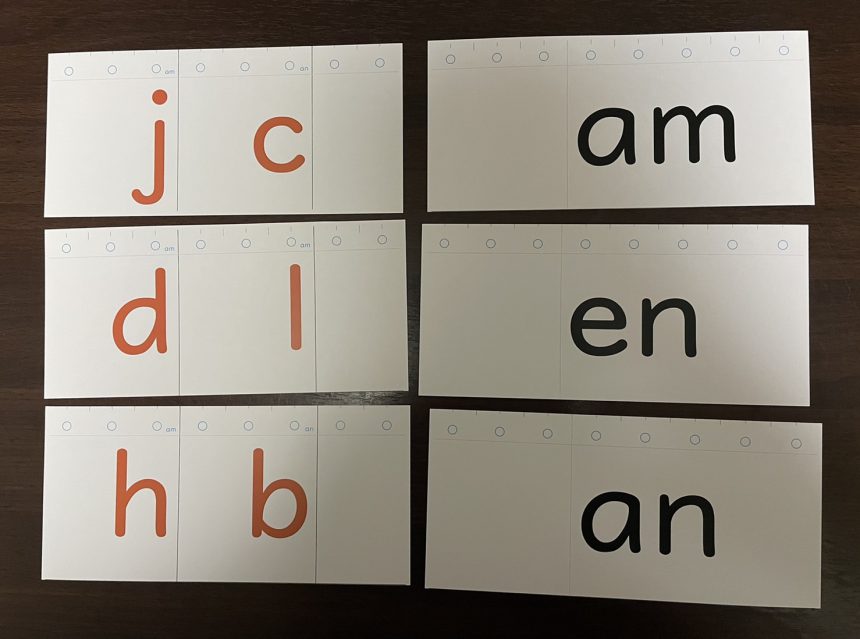
3. Check the hole positions and punch holes using a hole punch (you can also use a two-hole punch).
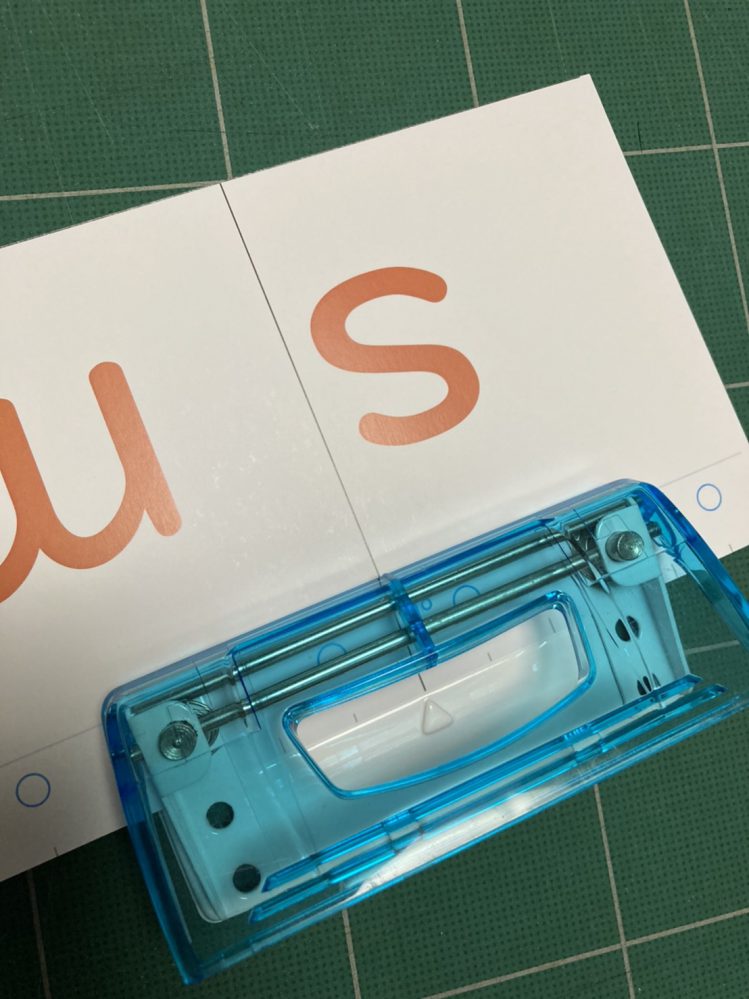
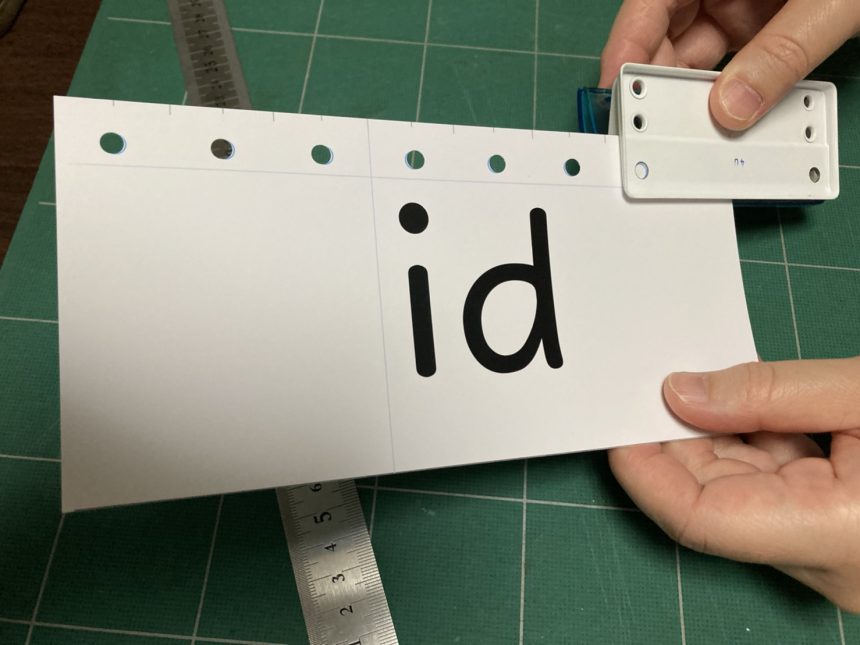
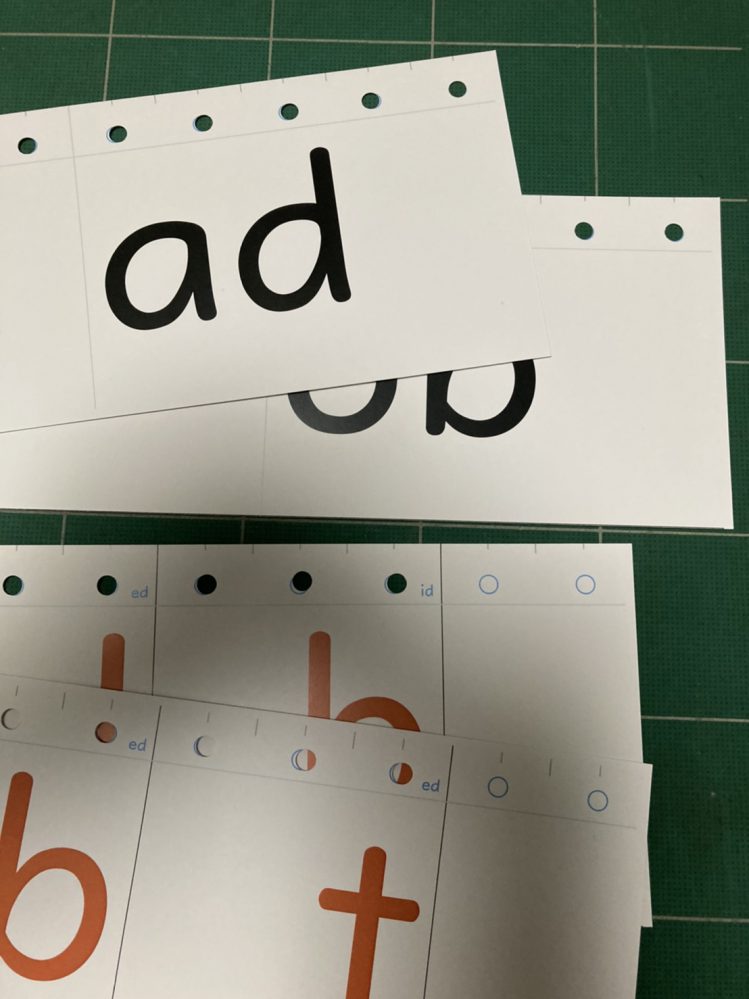
④ Use a cutter to cut off the black vertical lines on the onset card (be careful not to cut off the vertical lines on the lime card).
⑤ Stick a sticker on the back of the card to reinforce the hole.
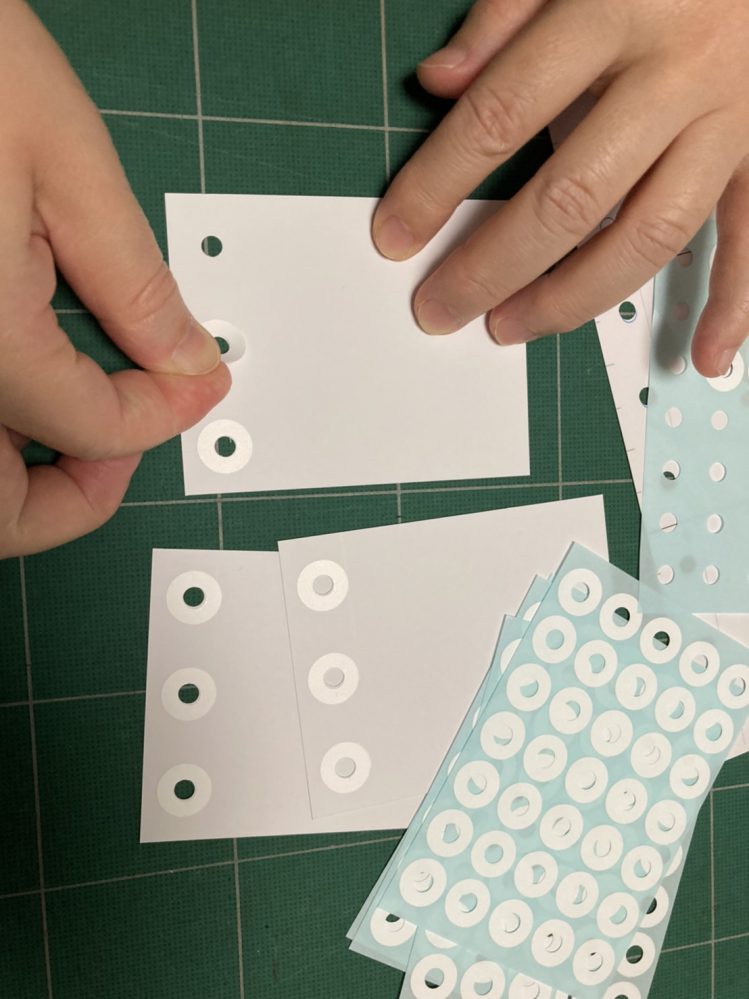
⑥ Place four online cards corresponding to the lime cards on top of each other and tie them together with a ring.
* The additional rhyme is displayed in the upper right corner of the onset card.
* Please adjust the number, position, and size of the rings flexibly depending on the number of sheets to be stacked and ease of use.
Guidance: Onset Lime Card Instruction
① First, check the sound of the onset phonemes using the "English Word Picture Cards" in Stage 2.
Student: a, a, apple. b, b, bed. c, c, cat. …………
② Next, check the sound of the rhyme.
Teacher: a, g, ag. Repeat after me. * Point to the letter on the card and make the sound. a, g, ag. …………
Student: a, g, ag. …………
Verify that the sound is now repeated correctly.
③ Practice connecting the onset and rhyme.
Teacher: b, b, bag. Repeat after them. * Point to the letter on the card and make the sound. b, b, bag. …………
Student: b, b, bag. ………
Verify that the sound is now repeated correctly.
④ Move to the next slide.
Teacher: Now, how do you pronounce it next? (Give only the onset) g, g, ? (Wait for the student to say gag) That's right. G, g, gag.
Now let's repeat together: g, g, gag.
Student: G, g, gag. ………
Then repeat the same process.
⑤ It would be perfect if the students could pronounce the words by themselves just by looking at the slides!
Even if learners can memorize English vocabulary, there are many who say, "I don't know how to use it." What kind of teaching and learning methods can help students master the word order in English, which is different from Japanese? This is an area where Japanese, being the first language, can interfere.
Teaching material "Word arrangement cards"

*Illustrations provided by Nozomi Kudo: She has published books such as "One Pencil! Easy Illustration Practice Book" (Hobby Japan) and is currently active in illustrating manga, advertisements, picture books, and more, focusing on cuts of animals and children.https://room226.jimdofree.com/
the purpose: The illustrated "word arrangement cards" allow you to identify the subject, object, and verb by the color of the frame, making learning how English words are arranged fun.
Teaching materials: Cut out the "Word Arrangement Cards" and use them. You can also create your own words on the blank cards. There is no background color to make it easier to draw illustrations.


There are several stages in language acquisition. For many people who learn and use their native language without any difficulty, such as letters, sounds, and syntax, they probably never even think about this.
I have a license to teach Japanese, and when I studied to obtain that qualification, I was able to gain a new understanding of Japanese characters, the structure of sounds, grammar, usage, etc. When learning a foreign language, you often compare it with your native language and refer to it, and each time you do so, you may find yourself gaining a new understanding of your native language.
In Japanese sentences, for example, words are arranged in the order of "subject-object-verb," whereas in English sentences, they are arranged in the order of "subject-verb-object." Some learners can learn this word order inductively by looking at several examples, while others find it difficult.
This ability is considered one of the language learning aptitudes (abilities that are advantageous when learning a language), and is known as "grammatical sense." Learners who have the ability to sense how certain elements function in a sentence are said to have an advantage in language learning, but on the other hand, there are also learners who are weak in this sense, and even if they can memorize English words, there are many learners who say, "I don't know how to arrange them."
So, what kind of knowledge and skills are needed to understand English word order (syntax) and communicate what you want to say? For example, what knowledge is needed to read and understand the following English sentence?
I saw a pretty puppy running after a big dog in the park yesterday.
"Yesterday, I saw a cute puppy chasing a big dog at the park."
1) Information on "who did what" is necessary, and in order to understand "I saw," functional knowledge of "subject and verb" and semantic knowledge of words are required.
② In order to obtain information about "what he saw," functional knowledge of "participles" and semantic knowledge of words are necessary to understand the part "the puppy is chasing the big dog."
3) To understand "where" and "when," you need to know the meaning of words.
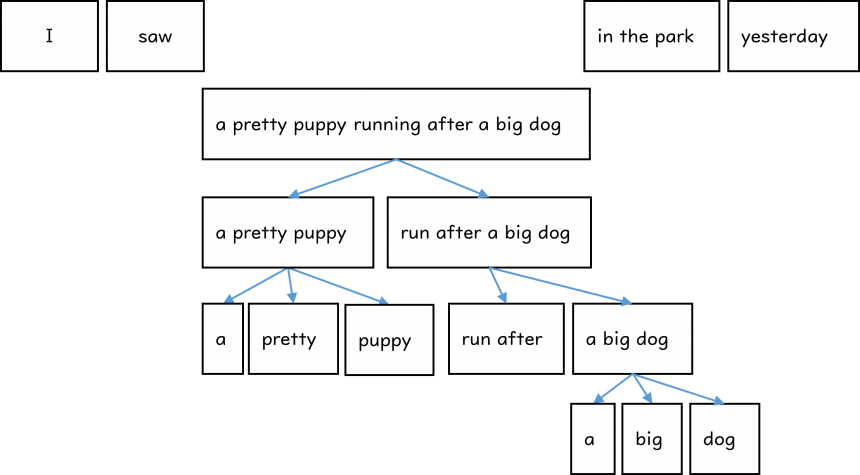
Even if you can easily grasp the situation in your native language, there are actually several layers to understanding it. Even if you can understand it, it can be quite difficult to actually output it.
According to Ogura (2007), research has shown that Japanese children in the early stages of language development have a conceptual tendency that makes it easy to learn nouns. Therefore, even in the case of English as a foreign language, instruction using a process similar to that of native language development is thought to be effective for learners who are prone to cognitive burdens.
First, let's consider an example of teaching the basic order of English nouns: "subject + verb + object." If nouns are used, the same applies to "subject + verb + complement," but in this case, you must also pay attention to the type of be verb. At first, try to focus on activities that have as few exceptions as possible and allow students to simply become familiar with the order.
Reference: Ogura, Tamiko (2007), Early vocabulary development in Japanese children, Gengo Kenkyu (Language Studies), Vol. 132, 29–53.
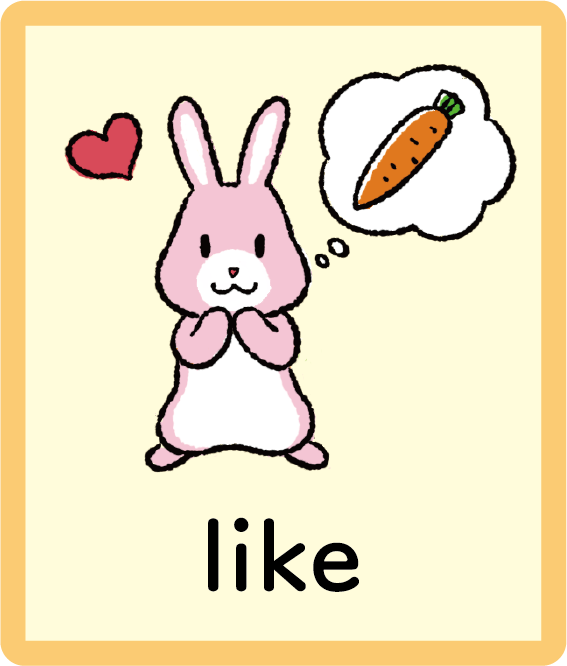
Guidance: "Subject + Verb + Object" Edition [For beginners]
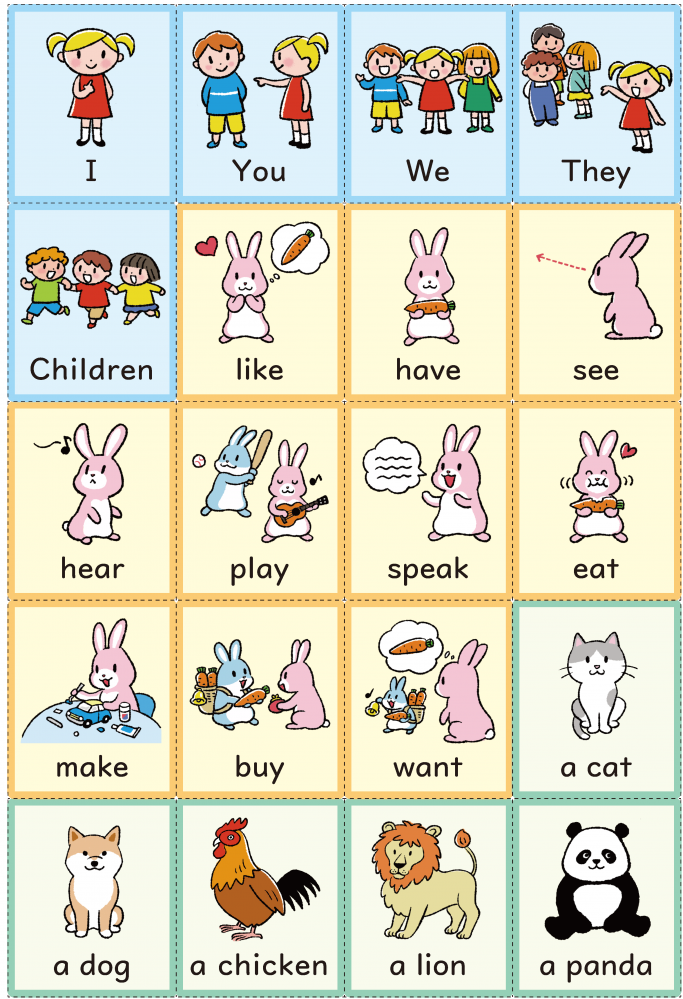
① Prepare the following vocabulary cards (with illustrations). The object nouns are in the singular to make them easier to introduce.


② Check whether you can pronounce the words on the vocabulary cards correctly.
Teacher: Now, let's review the words. Please pronounce them after me. At the same time, please also look closely at the illustrations to confirm their meanings.
Here we go. Like, like (show the card and check the pronunciation)
③ Input basic sentence examples.
Teacher: Choose one of the green cards that you like.
Student: (Choose one)
Teacher: Yes. Did you choose? What did you choose? Show it to your neighbor and try pronouncing it in English.
Student: (checks with the student next to him)
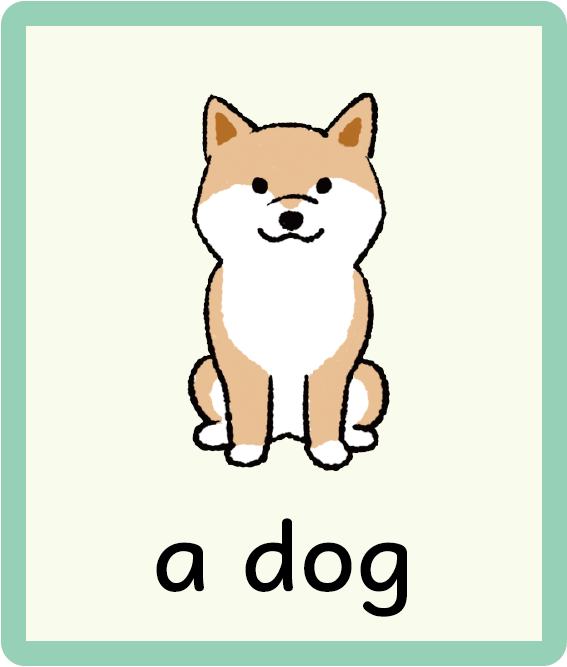
Teacher: This is my favorite thing. What is this in English? (Shows a dog card)
Student: Dog!
Teacher: That's right. Now, listen carefully. I like a dog. I like a dog.
(Put three cards on the board: I / like / a dog)
I like a dog. Now try saying it again: I like a dog.
Student: I like a dog. I like a dog.
Teacher: (Putting two cards, "I" and "like," on the board) Now, please tell the person next to you what you like. (After making sure that the student has finished talking with the person next to you) Okay. Now, everyone, please stand up.
Go around the classroom and tell five friends what you like, then return to your seat.
——— At this point, the positional relationship between the subject, verb, and object, i.e., "〇〇 likes XX," is input. ———
Students: (students interact with each other)
④ Practice repeating what the other person says by changing the subject.
Teacher: (Point to one student) What do you like? (If you don't understand, ask again, "You like what?")
Student: I like a cat.
Teacher: You like a cat. (As you say "you," point your hand toward the student to emphasize that you are the one being addressed.) (Put up a "You like a cat" card on the board.)

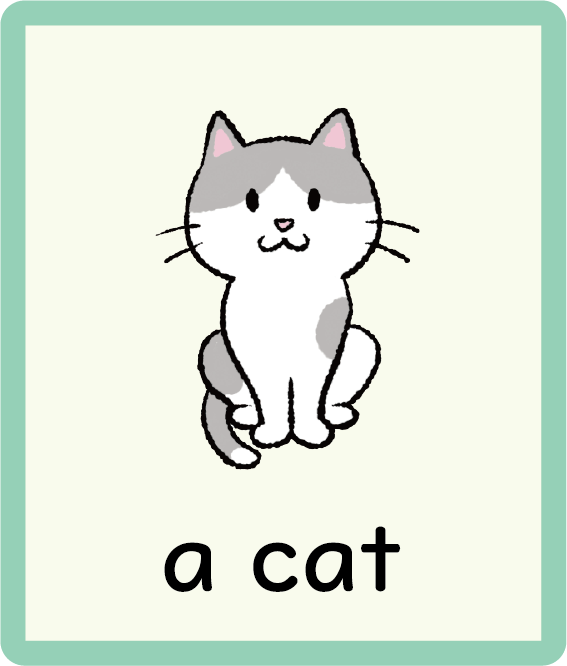
You like a cat. I like a dog. Yes. Please repeat. You like a cat. I like a dog.
Student: You like a cat. I like a dog.
Teacher: Yes, that's right. Now, try interacting with your neighbors in the same way. (Leave the "You like" card on the board.) First, one person should tell you what they like. The person listening should say "You like ……." and then say what the other person likes, followed by "I like ……." Once you've finished with your neighbor, stand up and try interacting with five other friends. Here you go.
Practice until you can smoothly use subjects, verbs, and objects. Learn the basic word order, "〇〇 does XX △△." For a while, increase your noun vocabulary while also adding verb vocabulary, aiming to solidify it.
*You can add new words to the "blank cards" or use the word cards at the back of your English textbook.
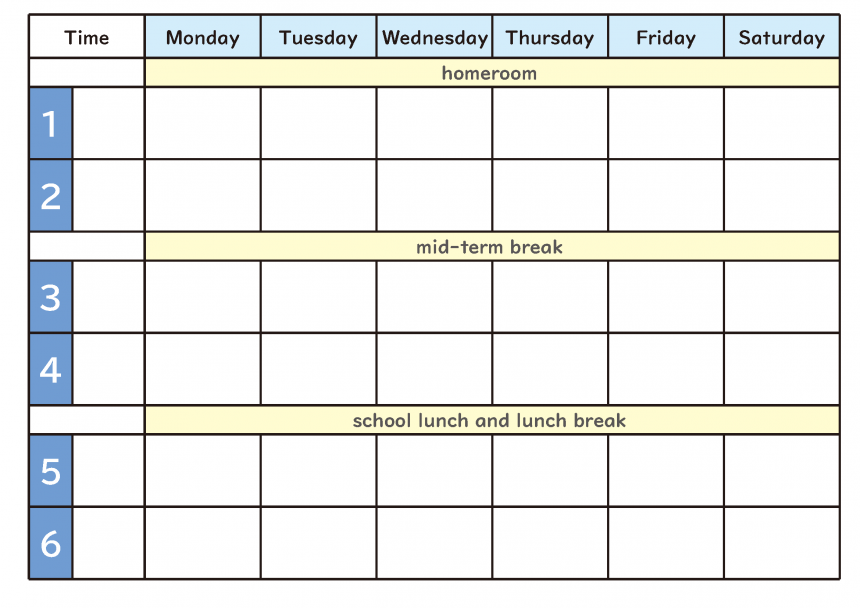
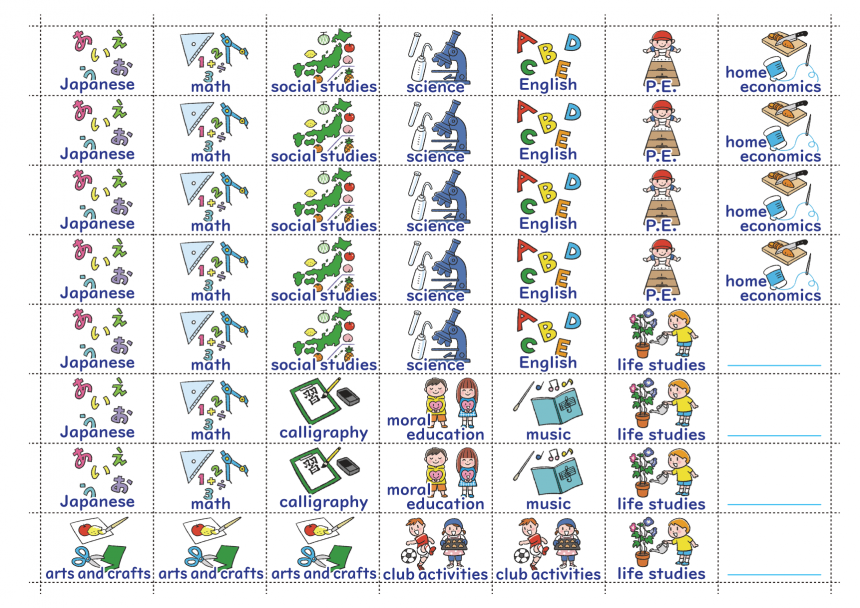
Using the words that appear on the "Word Arrangement Cards,"Materials for creating timetablesIt can be written in kana, kanji, and English, so please use the English sheet.
Some learners can read and comprehend simple English sentences, but find it increasingly difficult to comprehend complex or compound sentences, or even longer texts. Longer texts require short-term memory, working memory, and logical thinking skills, but the difficulty of comprehending complex or compound sentences may be alleviated through explicit instruction on conjunctions. What learning methods are particularly effective for learners with weak working memory? Here, we first introduce how to familiarize students with longer English texts by practicing using simple conjunctions to join short sentences together while understanding their relationships.
Explanation of how to use the "Conjunction Stamp Card"
the purpose:
The goal is to understand the function of conjunctions and the relationship between the words before and after them, and to become familiar with using simple conjunctions.
Teaching materials:
English Sentence Cards: Cards with short English sentences


Conjunction Cards

<Feelings Stamps> If you need to make the content of the English text easier to understand, add the following stamps to the cards to make the activity easier.

Examples of conjunctions: and, but, because, as, when, so that, or …
Simple English Sentence Examples: Prepare English sentences that express simple situations according to the learners' level.
*The purpose of this activity is to get used to understanding the content of simple sentences and connecting them with appropriate conjunctions, so the English sentences used should be simple and easy to understand.
He met his old friends
He bought a new CD
She caught a cold
She got up late
She didn't go out
We watched a movie
I was surprised
He was happy.
He was not happy.
She was at home.
She missed a bus.
We enjoyed it.
I heard the news on TV.
Activity Procedures
Before starting the activity, review the meanings of the conjunctions you will be using.
Also, make sure there are no words in the English that you don't understand.
Instruction 1:Practice choosing a conjunction to join two simple sentences
① Arrange the English sentence cards on the left and right sides as shown below. Cards that begin with a capital letter are placed in front, and cards that begin with a lowercase letter are placed at the back.
"Now, let's try to connect these two English sentences well. First, let's understand these sentences."

② Place two conjunction cards between the students and ask them to choose one.
"Do you connect sentences with "and" or "but"?"

3) Check your answers and read them out loud.
"Yes, 'He met his old friends and he was happy.' Now please repeat that."

Instruction 2:Practice choosing a sentence that connects to the previous sentence and a conjunction
① Arrange the English sentence cards and conjunction cards with capital letters at the beginning of the sentence as shown below. "Now, let's read this sentence and conjunction. What sentence follows next?"
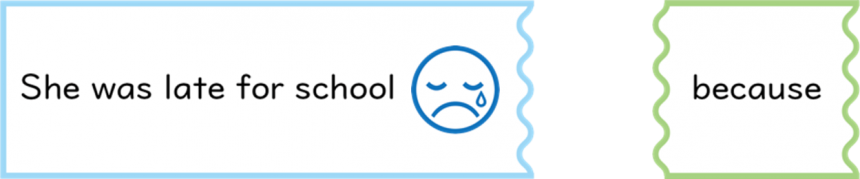
② Arrange some English sentence cards in the second half as follows:
"Let's read two English sentences. Which one is easier to connect to the previous sentence?"

Check your answers and read them out loud.
"Yes, 'She was late for school because she missed the bus.'"

First, get used to using basic conjunctions such as and, but, and because, which will make it easier to understand the connections between simple sentences. Gradually increase the tempo and practice repeatedly until you can select them more or less automatically.
Conjunction stamp card mock lesson video
We are also distributing a sample PowerPoint lesson of the conjunction stamp cards used in the video. It includes audio from Professor Mutsumi Iijima of Gunma University, and allows you to easily experience an actual lesson using the PowerPoint lesson: "Lesson 1: Practice choosing a conjunction to connect two simple sentences."
The teaching materials are available at the top of the site.Teaching material download form" is available for download.
Coming soon…
Coming soon…
Coming soon…
Coming soon…
The "UD Digital Textbook Font" and the European font "UD Digikyo Latin" used in the teaching materials are available through the MORISAWA BIZ+ service (55 UD fonts available for 330 yen per month). https://www.morisawa.co.jp/products/fonts/bizplus/lineup/
Also, please use the video below as a reference when creating new teaching materials.
"UD Digital Textbook Font Western Series"